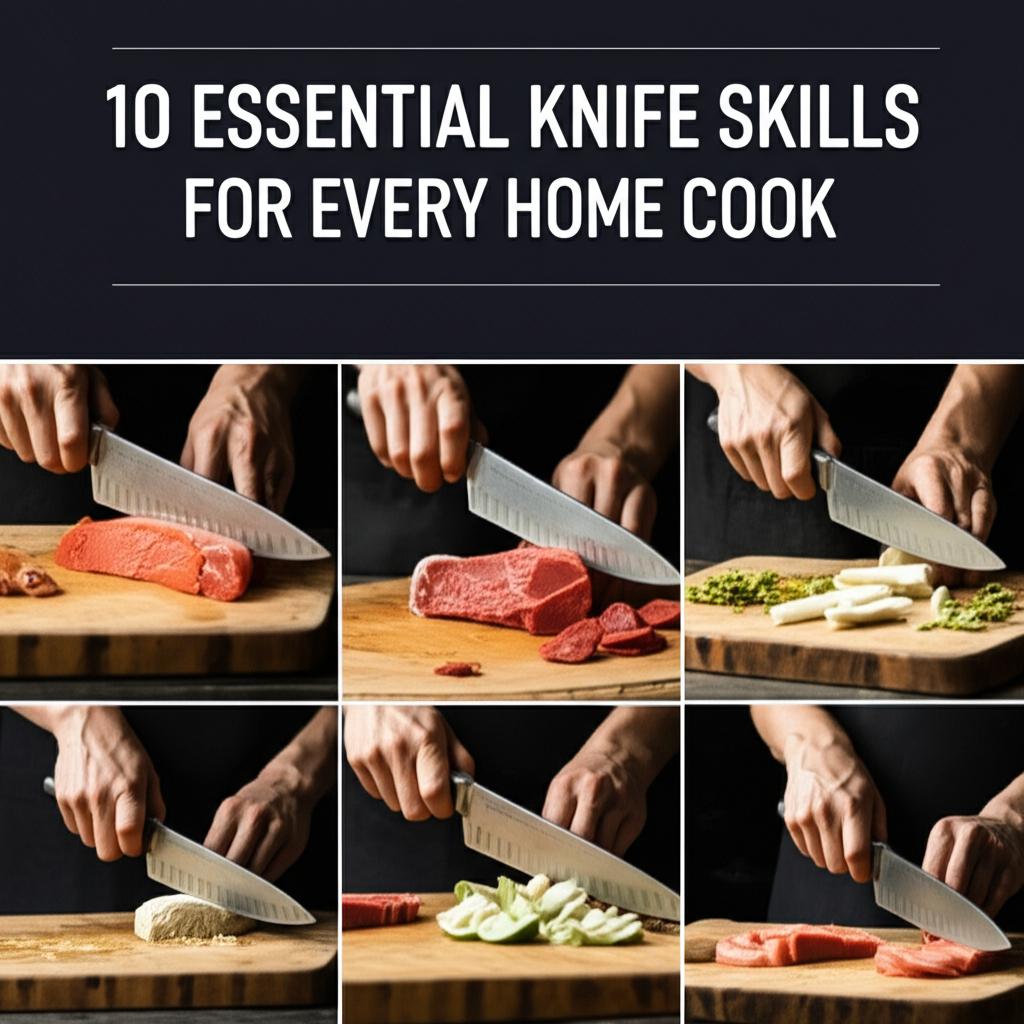
Slice, Dice, and Conquer: 10 Essential Knife Skills for Every Home Cook
- imarku Chef Knife – 8 Inch Home Essentials Sharp Kitchen knife HC Steel Japanese Knife Paring knife, Birthday Gifts for Women/Men, Gifts for Mom/Dad, Kitchen Gadgets with Premium Gift Box
- PAUDIN Chef Knife, 8 Inch High Carbon Stainless Steel Sharp Kitchen Knife with Ergonomic Handle, Gift Box for Family & Restaurant
- HENCKELS Classic Razor-Sharp 8-inch Slicing Knife, German Engineered Informed by 100+ Years of Mastery, Stainless Steel
Do you ever feel a little intimidated by your kitchen knives? Perhaps chopping an onion feels like a precarious balancing act, or maybe you’re just not getting those beautifully uniform slices you see on cooking shows. You’re not alone! Mastering basic knife skills is one of the most transformative things you can do in your kitchen.
It’s not just about speed; it’s about safety, efficiency, and ultimately, better food. Properly cut ingredients cook more evenly, look more appealing, and make the whole cooking process more enjoyable. Forget fancy gadgets; your knives are your most versatile tools.
This detailed guide will walk you through 10 essential knife skills that every home cook should master. We’ll break down each technique with clear, step-by-step instructions, helpful tips, and common mistakes to avoid. Get ready to build your confidence and become a kitchen pro!
The Golden Rule: Safety First!
Before we dive into the skills, remember that a sharp knife is a safe knife. A dull knife requires more force to cut, increasing the chances of it slipping and causing injury. Always use a cutting board that doesn’t slip (place a damp paper towel underneath for extra grip). And remember: never try to catch a falling knife! Step back and let it drop.
1. The Essential Chef’s Grip (The Pinch Grip)
This is the foundation of knife control and precision. Forget gripping the handle like a baseball bat; a proper grip gives you maximum stability.
- Why It Matters: Gives you superior control over the blade, making your cuts more precise and reducing the risk of slipping.
- How-To:
- Hold your knife by gripping the blade itself, not just the handle.
- Place your thumb on one side of the blade near the bolster (where the blade meets the handle).
- Curl your forefinger on the opposite side of the blade, pinching it gently but firmly.
- Your remaining three fingers should comfortably wrap around the handle.
- Tips:
- Feel how this grip locks the blade in place. It might feel awkward at first, but practice makes perfect.
- Ensure your wrist is straight and relaxed, not bent or tense.
- Common Mistakes to Avoid:
- The “Hammer Grip”: Holding only the handle with all fingers wrapped around it. This gives you less control over the blade’s tip.
- Too Loose a Grip: You need enough pressure to feel secure, but not so much that your hand cramps.
2. The Protective Claw Grip
This is arguably the most important knife safety skill you’ll learn. It keeps your guiding hand’s fingers tucked away and safe from the blade.
- Why It Matters: Protects your fingertips from accidental cuts! It also helps you guide the knife consistently.
- How-To:
- Place the hand not holding the knife (your guiding hand) firmly on top of the food you’re cutting.
- Curl your fingertips inward, tucking them under your knuckles, as if making a claw.
- Your knuckles should be out in front, acting as a protective barrier for your fingertips.
- The side of the knife blade should rest against your knuckles as you cut, guiding the knife.
- Tips:
- Keep your knuckles firm and straight. They are your guide rails.
- Practice on something soft like a cucumber or potato until you feel comfortable.
- Common Mistakes to Avoid:
- Flat Hand: Laying your hand flat on the food, exposing your fingertips to the blade. This is incredibly dangerous.
- Extended Fingers: Not curling your fingers enough, leaving them vulnerable.
3. Basic Slicing & Chopping (The Rocking Motion)
Most cutting in the kitchen involves a fluid rocking motion, especially with a chef’s knife. This technique is for basic, everyday slicing and chopping.
- Why It Matters: Creates uniform slices and allows for efficient cutting without lifting the entire knife off the board after every chop.
- How-To:
- Start with the tip of the knife on the cutting board, resting on the food.
- Using your pinch grip, push the knife down and forward (or down and back, depending on your comfort) through the food.
- The knife should rock smoothly along its curve, from tip to heel.
- As you complete the cut, lift the heel of the knife slightly while keeping the tip in contact with the board, ready for the next slice.
- Use your claw grip to push the food forward as you slice.
- Tips:
- Let the knife do the work. Don’t force it; a sharp knife will glide through.
- Focus on a smooth, rhythmic motion.
- Common Mistakes to Avoid:
- “Chopping” Straight Down: Lifting the entire knife up and bringing it straight down, which is less efficient and puts more strain on your wrist.
- Not Using the Full Blade: Only using the tip or heel, which makes cuts less clean.
4. Dicing an Onion Like a Pro
Dicing an onion is a fundamental skill that demonstrates proficiency in basic cuts and the use of the claw grip.
- Why It Matters: Uniform pieces cook evenly and integrate perfectly into sauces, stir-fries, and stews. Plus, it’s a very common task!
- How-To:
- Halve the onion through the root end. Peel off the papery outer layers.
- Place one half cut-side down on the cutting board, with the root end facing away from you. Keep the root end intact – it holds the onion together.
- Make several horizontal cuts through the onion, parallel to the cutting board, stopping before the root end. Be careful not to cut all the way through the onion.
- Make several vertical cuts from the top of the onion down towards the root end, again stopping before the root.
- Now, rotate the onion 90 degrees. Using your claw grip and rocking motion, slice down from the top, creating your dice. The cuts you made earlier will ensure even pieces.
- Tips:
- Keep the root end intact! This is key for holding the onion together during the cuts.
- A sharp knife reduces tearing and crying.
- Common Mistakes to Avoid:
- Cutting off the root end: This causes the onion layers to separate and makes dicing much harder.
- Cutting all the way through on the horizontal or vertical cuts, leading to loose, uneven pieces.
5. Mincing Garlic (Finely Chopped Flavor)
Mincing garlic allows its pungent flavor to distribute throughout a dish. This technique creates a very fine, almost paste-like consistency.
- Why It Matters: Maximizes flavor distribution without encountering large, overpowering chunks of garlic.
- How-To:
- Place a garlic clove on the cutting board. Using the flat side of your chef’s knife, smash the clove firmly but carefully with the heel of your hand. This loosens the peel and breaks down the fibers.
- Peel and discard the skin.
- Roughly chop the garlic into small pieces.
- Gather the chopped garlic into a small pile. Place the tip of your knife on the board over the pile.
- Rock the knife back and forth over the garlic, pivoting from the tip, gathering the garlic back into a pile as needed, until it reaches your desired fine consistency.
- Tips:
- For an even finer mince, sprinkle a pinch of salt over the garlic before mincing. The salt acts as an abrasive, helping to break down the garlic cells further.
- You can also add a few drops of olive oil to prevent the garlic from sticking to the knife.
- Common Mistakes to Avoid:
- Not smashing the garlic first: Makes peeling harder and mincing less effective.
- Trying to chop too finely without rocking: This creates uneven pieces and is less efficient.
6. The Julienne Cut (Elegant Matchsticks)
The julienne cut creates elegant, thin matchsticks, perfect for salads, stir-fries, or garnishes. It demonstrates precision and patience.
- Why It Matters: Even cooking and beautiful presentation. A uniform cut ensures all pieces cook at the same rate.
- How-To (using a carrot as an example):
- Peel the carrot. Cut off the ends.
- Square off the carrot: Trim the sides to create a rectangular block. This creates flat surfaces for stability.
- Slice the block lengthwise into thin, uniform planks (about 1/8 to 1/16 inch thick).
- Stack a few of these planks neatly on top of each other.
- Using your claw grip, slice down the stacked planks lengthwise to create thin, uniform matchsticks (about 1/8 to 1/16 inch thick and 2-3 inches long).
- Tips:
- Practice with root vegetables like carrots or potatoes, as they are firm and hold their shape well.
- Aim for consistency in your planks first, then in your matchsticks.
- Common Mistakes to Avoid:
- Not squaring off the vegetable: This makes it unstable and harder to get uniform planks.
- Uneven plank thickness: This will lead to uneven matchsticks.
7. Trimming & Prepping Vegetables
This skill is about efficiently getting your vegetables ready for cooking, removing waste, and shaping them for consistency.
- Why It Matters: Reduces food waste, ensures consistent cooking, and improves the overall appeal of your dish.
- How-To (general principles):
- Inspect: Look for blemishes, tough outer layers, or undesirable parts (e.g., tough ends of asparagus, core of a cabbage).
- Remove: Use your knife to cleanly remove these parts. For carrots or potatoes, this might mean a simple peel. For bell peppers, it’s removing the core and seeds.
- Shape: If necessary, trim vegetables to a more manageable shape or size before dicing, slicing, or mincing (e.g., squaring off a potato for julienne).
- Tips:
- Use a smaller paring knife for delicate tasks like hulling strawberries or peeling small vegetables.
- Consider saving vegetable scraps for stock!
- Common Mistakes to Avoid:
- Being too wasteful: Don’t cut off more than necessary.
- Not cleaning vegetables properly: Always wash produce thoroughly before cutting.
8. Butterflying Chicken Breasts (for Even Cooking)
This technique allows you to transform a thick chicken breast into a thinner, uniform piece, perfect for faster cooking or stuffing.
- Why It Matters: Ensures even cooking, preventing dry edges and undercooked centers. Ideal for cutlets or stuffing.
- How-To:
- Place a boneless, skinless chicken breast flat on your cutting board.
- Place one hand firmly on top of the chicken breast to hold it steady.
- Using a sharp chef’s knife, carefully begin to slice horizontally through the thickest part of the breast.
- Slice about halfway through, stopping just before you cut all the way through to the other side.
- Open the chicken breast up like a book. You now have a thinner, more uniform piece.
- Tips:
- Go slow and steady. It’s easy to cut all the way through if you rush.
- A sharp knife is crucial for a clean cut.
- If you need it even thinner, you can place it between two pieces of plastic wrap and gently pound it with a mallet or rolling pin.
- Common Mistakes to Avoid:
- Cutting all the way through: You’ll end up with two separate pieces instead of one butterflied piece.
- Uneven thickness: Try to keep your slice consistent across the breast.
9. Honing Your Knife (Maintaining Sharpness)
This is NOT sharpening. Honing realigns the microscopic edge of your knife, which gets bent over time with use. It keeps your knife feeling sharp between professional sharpenings.
- Why It Matters: A sharp knife is a safe and efficient knife! Honing regularly maintains the edge, preventing it from becoming dull too quickly.
- How-To (using a honing steel):
- Hold the honing steel vertically on a stable surface (like a cutting board), tip down.
- Hold your knife blade against the steel at a consistent 20-degree angle. Imagine cutting a thin slice off the steel.
- Starting with the heel of the blade, draw the knife down and across the steel towards the tip, in a fluid arc.
- Repeat on the other side of the steel, using the same angle.
- Do 5-10 strokes on each side.
- Tips:
- Consistency in angle is key. If you’re unsure about the 20-degree angle, look up “knife sharpening angle guide” online for visuals.
- Use light pressure – you’re realigning the edge, not grinding it away.
- Hone your knife before each use or at least every few uses.
- Common Mistakes to Avoid:
- Wrong angle: Too steep or too flat won’t hone the edge effectively.
- Too much pressure: Can damage the edge or scratch the blade.
- Confusing honing with sharpening: Honing maintains an edge; sharpening creates a new one. Your knives will still need professional sharpening periodically.
10. Safe Knife Storage & Cleaning
Proper care ensures your knives stay sharp, last longer, and are always safe to handle.
- Why It Matters: Extends the life and sharpness of your knives, and prevents accidents.
- How-To:
- Wash Immediately: After use, wash your knives by hand with warm, soapy water.
- Dry Thoroughly: Immediately dry your knives with a clean towel. Air-drying can lead to rust spots or water marks.
- Store Safely:
- Knife Block: A classic and safe choice, keeping blades protected.
- Magnetic Strip: Convenient for visibility and quick access, but ensure knives are placed carefully.
- In-Drawer Tray/Sheath: If storing in a drawer, use a knife tray or individual blade sheaths to prevent damage to the edge and protect your hands.
- Tips:
- NEVER put good kitchen knives in the dishwasher. The harsh detergents and high heat can dull the edge, damage the handle, and cause pitting or rust.
- Don’t leave knives soaking in the sink; it’s a safety hazard and bad for the blade.
- Common Mistakes to Avoid:
- Dishwasher Use: This is the quickest way to ruin a good knife.
- Leaving wet: Causes rust and dulls the edge.
- Throwing loose in a drawer: Dangerous for you and bad for the knife’s edge.
Ready to Cut with Confidence?
Mastering these 10 essential knife skills will transform your cooking experience. You’ll be safer, more efficient, and your food will look and taste better than ever before. Remember, practice is key. Start with simple vegetables, take your time, and don’t be afraid to make mistakes. Every chop is a step closer to becoming a more confident and capable home cook.
So, grab your sharpest knife, pick a skill, and start slicing and dicing your way to kitchen mastery!
- imarku Chef Knife – 8 Inch Home Essentials Sharp Kitchen knife HC Steel Japanese Knife Paring knife, Birthday Gifts for Women/Men, Gifts for Mom/Dad, Kitchen Gadgets with Premium Gift Box
- PAUDIN Chef Knife, 8 Inch High Carbon Stainless Steel Sharp Kitchen Knife with Ergonomic Handle, Gift Box for Family & Restaurant
- HENCKELS Classic Razor-Sharp 8-inch Slicing Knife, German Engineered Informed by 100+ Years of Mastery, Stainless Steel
FAQ
Q. Why are these 10 knife skills considered essential for every home cook?
A. These 10 skills form the foundational techniques for efficient, safe, and enjoyable food preparation. They cover everything from basic chopping and dicing to more advanced tasks like julienning and filleting, enabling home cooks to confidently handle a wide variety of ingredients and recipes, ultimately saving time and improving the quality of their meals.
Q. What is the single most important knife skill to master first if I’m a beginner?
A. The most crucial skill for a beginner is learning the proper knife grip and the “claw” hand position for your guiding hand. A secure grip provides control, while the “claw” protects your fingertips and allows for smooth, consistent cuts. Mastering these two elements lays the groundwork for all other techniques.
Q. How can I practice these knife skills safely at home without wasting food?
A. You can practice safety and technique using inexpensive, readily available ingredients like potatoes, carrots, or onions. Even better, use a damp cloth or non-slip mat under your cutting board to prevent it from sliding. Focus on slow, deliberate movements until you build muscle memory and confidence, rather than trying to achieve speed initially.
Q. Do I need expensive, professional knives to effectively learn and practice these skills?
A. Absolutely not. While a good quality, sharp knife makes the job easier and more enjoyable, you don’t need a professional-grade set. A sharp chef’s knife, a paring knife, and possibly a serrated knife are usually sufficient for a home cook. The key is that your knives are sharp, as a dull knife is actually more dangerous and requires more force to use.
Q. How long does it typically take to become proficient in these essential knife skills?
A. Proficiency varies greatly from person to person. With consistent practice, you can see significant improvement in your speed and precision within a few weeks to a couple of months. True mastery, where cuts become second nature and effortless, can take longer, but even a moderate level of proficiency will dramatically improve your cooking experience.
Q. Can mastering these knife skills truly prevent kitchen accidents and injuries?
A. Yes, absolutely. A significant number of kitchen knife accidents occur due to dull knives, improper grip, or unsafe cutting techniques. By learning and consistently applying proper knife skills, you gain better control over the blade, protect your guiding hand, and reduce the likelihood of slips and cuts, making your kitchen a much safer place.
Q. Where can I find reliable resources or hands-on training to further develop these skills?
A. Many resources are available. Online, you can find numerous reputable cooking channels on platforms like YouTube, online culinary courses, or food blogs that offer detailed tutorials. For hands-on experience, consider local cooking classes, community college programs, or culinary schools that offer beginner-friendly workshops on knife skills.