The Joy of Baking Bread: Your Ultimate Step-by-Step Guide to Homemade Perfection
- 2LB Bread Maker Machine, OSIPOTO 17 in 1 Automatic Stainless Steel Bread Machine, Non-stick, Beginner-Friendly Controls, 15 Hour Timer, Easy to Clean Low Noise, High Success Rate for Homemade Bread
- Elite Gourmet EBM8103M Programmable Bread Maker Machine 3 Loaf Sizes, 19 Menu Functions Gluten Free White Wheat Rye French and more, 2 Lbs, Mint
- Amazon Basics Programmable Bread Maker, 2 Pound Non-Stick Automatic Bread Making Machine, 14 Settings for Breads, Doughs, Gluten-Free Options and More, LCD Display, White
There’s something uniquely comforting and deeply satisfying about the aroma of freshly baked bread wafting through your home. It’s a scent that evokes warmth, nostalgia, and a sense of accomplishment. While the idea of baking bread from scratch might seem daunting, it’s a surprisingly rewarding and therapeutic process that anyone can master.
This comprehensive, step-by-step guide will walk you through the magical journey of transforming simple ingredients into a beautiful, homemade loaf of bread. Get ready to discover the joy of baking bread and impress yourself (and your taste buds!).
Why Bake Your Own Bread? Beyond the Delicious Taste!
Beyond the undeniable deliciousness, baking your own bread offers numerous benefits:
- Therapeutic Process: The rhythmic kneading and the patient waiting for the dough to rise can be incredibly calming and meditative.
- Ingredient Control: You know exactly what goes into your bread – no mysterious additives or preservatives.
- Incredible Aroma: Nothing beats the comforting smell of freshly baked bread.
- Cost-Effective: Making your own bread is often much cheaper than buying artisanal loaves.
- Pure Satisfaction: There’s immense pride in pulling a golden-brown loaf from your oven, knowing you created it with your own hands.
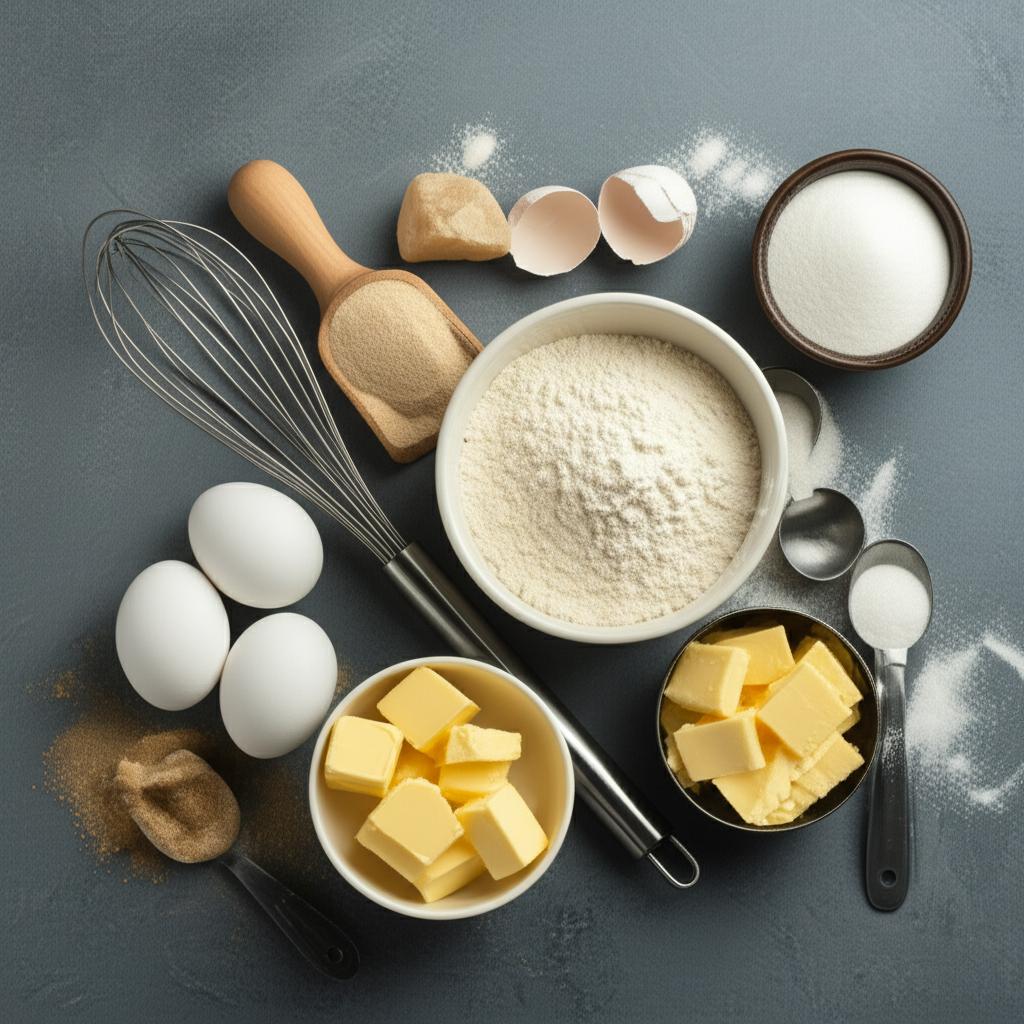
Essential Ingredients for Your First Loaf
For a basic, delicious loaf of bread, you’ll need just a few simple pantry staples. The beauty is in their transformation!
- Flour: The backbone of your bread. For beginners, all-purpose flour works well, but bread flour (which has a higher protein content) will give you a chewier, more structured crumb.
- Yeast: The magical ingredient that makes bread rise! You’ll typically use Active Dry Yeast or Instant Yeast. We’ll focus on Active Dry Yeast for this guide, as it requires proofing (a great learning step!).
- Water: The solvent that activates the yeast and brings the dough together. Temperature is crucial – too hot will kill the yeast, too cold won’t activate it.
- Salt: Don’t skip it! Salt isn’t just for flavor; it controls yeast activity and strengthens the gluten structure.
- Sugar (Optional, but Recommended): A small amount of sugar acts as food for the yeast, helping it to activate faster and also aiding in browning the crust.
Basic Equipment You’ll Need
You don’t need fancy gadgets to bake bread. Here’s a list of essentials:
- Large Mixing Bowl: For combining ingredients and the first rise.
- Measuring Cups and Spoons: For accurate ingredient ratios.
- Liquid Measuring Cup: For water.
- Kitchen Scale (Highly Recommended!): For the most accurate measurements, especially of flour.
- Dough Scraper (Optional): Helpful for handling sticky dough.
- Clean Kitchen Towel or Plastic Wrap: For covering the dough during rising.
- Baking Sheet or Loaf Pan: Depending on the shape of bread you want to bake.
- Oven: Of course!
- Wire Cooling Rack: Essential for cooling your baked bread.
The Step-by-Step Journey: Baking Your First Loaf
This guide assumes a basic white or whole wheat blend bread recipe using active dry yeast.
Step 1: Activate the Yeast (Proofing)
This is where the magic begins!
* In your large mixing bowl, combine 1 cup of warm water (around 105-115°F or 40-46°C – like warm bath water) with 1 tablespoon of sugar and 2 ¼ teaspoons (one standard packet) of active dry yeast.
* Gently stir and let it sit for 5-10 minutes.
* Look for foam or bubbles on the surface. This is your yeast “waking up” and confirming it’s alive and active. If you don’t see bubbles, your water might have been too hot or cold, or your yeast might be old. Start over with fresh yeast.
Step 2: Combine Dry Ingredients
While your yeast is proofing:
* In a separate bowl (or directly into the yeast mixture if your bowl is large enough), whisk together 3-3 ½ cups of bread flour (start with 3 cups and add more if needed during kneading) and 1-2 teaspoons of salt. The amount of salt depends on your preference, but usually, 1.5 teaspoons is a good starting point.
Step 3: Mix Wet into Dry
- Once your yeast is foamy, pour the yeast mixture into the bowl with the flour and salt.
- Using a sturdy spoon or your hands, mix until a shaggy, cohesive dough forms. It will be sticky and messy – that’s perfectly normal!
- If the dough seems too dry, add water a tablespoon at a time. If it’s too wet, add flour a tablespoon at a time.
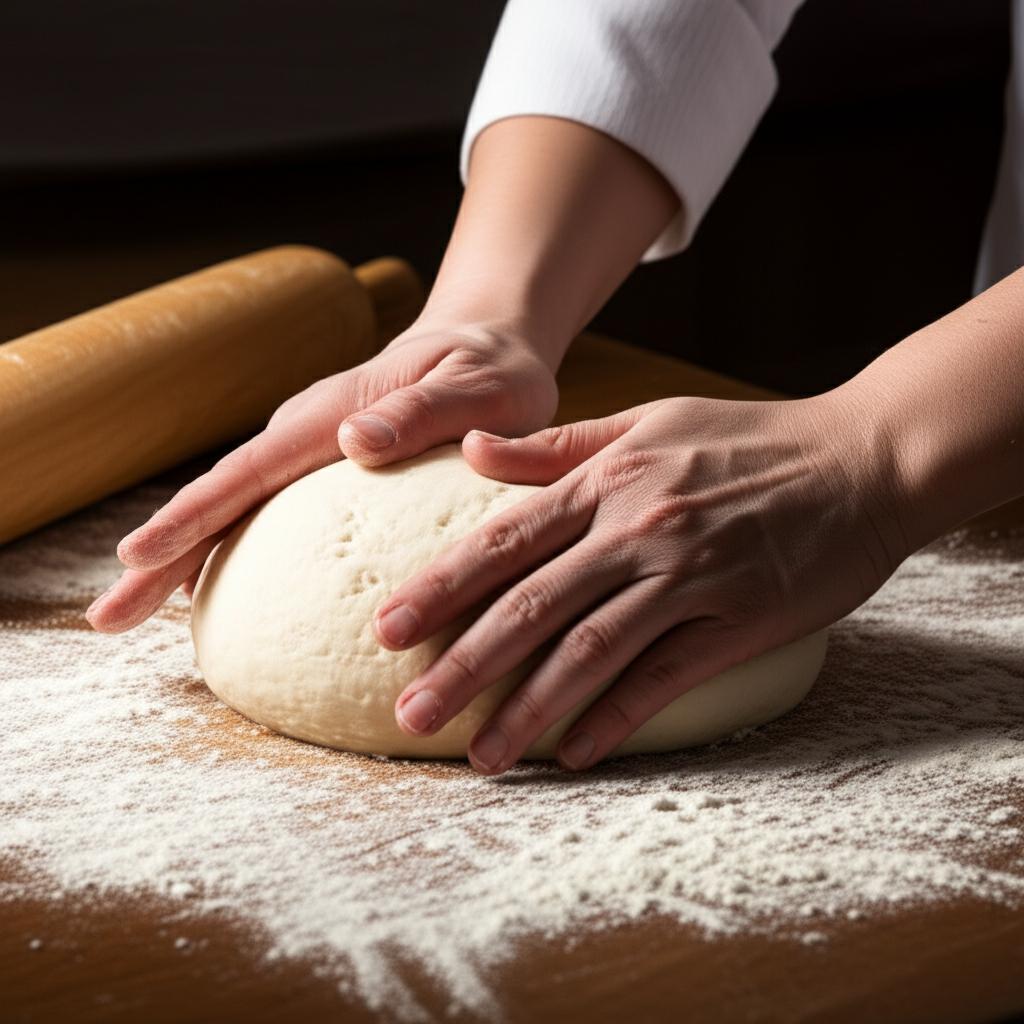
Step 4: The Art of Kneading
This is arguably the most crucial step for developing a good bread structure. Kneading develops the gluten in the flour, creating elasticity and strength.
* Turn the shaggy dough out onto a lightly floured surface (your countertop works great).
* Knead for 8-10 minutes. There are many techniques, but a common one is to push the dough away from you with the heels of your hands, fold it back over itself, give it a quarter turn, and repeat.
* Your goal is a smooth, elastic, and less sticky dough. It should spring back when lightly poked.
* The Windowpane Test: After 8-10 minutes, pinch off a small piece of dough and slowly stretch it between your fingers. If you can stretch it thin enough to see light through it without it tearing, your gluten is well-developed!
Step 5: First Rise (Bulk Fermentation)
This is where the yeast really gets to work, creating gas that makes the dough expand.
* Lightly grease your large mixing bowl with a little oil.
* Place the kneaded dough in the bowl, turning it once to coat the top with oil (this prevents a dry skin from forming).
* Cover the bowl tightly with plastic wrap or a clean, damp kitchen towel.
* Place the bowl in a warm, draft-free place (e.g., a slightly warm oven that’s turned off, or a sunny spot).
* Let the dough rise until it has doubled in size, which can take anywhere from 1 to 2 hours, depending on your room temperature and yeast activity. Patience is key here!
Step 6: Punch Down & Shape
- Once your dough has doubled, gently punch it down to release the gas. Don’t be too aggressive!
- Turn the dough out onto a lightly floured surface.
- Shape the dough into your desired loaf shape (a simple round boule, or an oblong loaf for a loaf pan). For a loaf pan, gently flatten the dough into a rectangle, then roll it up tightly, pinching the seam closed.
Step 7: Second Rise (Proofing)
This rise gives your shaped loaf its final lift and airy texture.
* Place your shaped dough on a lightly greased baking sheet or into your prepared loaf pan.
* Cover it again with plastic wrap or a clean towel.
* Let it rise in a warm, draft-free place for another 30-60 minutes, or until it looks puffy and has nearly doubled in size again. It should feel light and airy.
Step 8: Preheat Your Oven
- About 20 minutes before your second rise is complete, preheat your oven to 400°F (200°C). A hot oven helps the bread rise quickly (oven spring) and develop a good crust.
Step 9: Bake to Golden Perfection
- Carefully transfer your risen loaf to the preheated oven.
- Bake for 30-35 minutes, or until the crust is deep golden-brown and the loaf sounds hollow when tapped on the bottom.
- For ultimate certainty, use a meat thermometer inserted into the center of the loaf – it should read at least 200-210°F (93-99°C).
Step 10: Cool Completely
This step is just as important as baking!
* Once baked, immediately transfer the bread from the pan to a wire cooling rack.
* Allow the bread to cool completely (at least 1-2 hours, or until room temperature) before slicing. Cutting hot bread can make the inside gummy and ruins the texture.
Tips for Bread Baking Success
- Accurate Measurements: While baking is an art, bread making benefits greatly from precision. Use a kitchen scale for flour and water for the most consistent results.
- Water Temperature is Key: Too hot will kill the yeast; too cold will inhibit it. Aim for that “warm bath water” feel.
- Don’t Skimp on Kneading: This is essential for gluten development, which gives your bread its structure and chewiness.
- Patience with Rising: Don’t rush the rises. The yeast needs time to work its magic. A cool environment means a slower rise, which can actually lead to more flavor development!
- Proper Cooling: Resist the urge to slice into that warm loaf too soon. Cooling allows the internal structure to set and steam to escape, preventing a gummy interior.
- Humidity Matters: On very humid days, you might need slightly more flour; on very dry days, a little more water. Adjust as needed.
Common Bread Baking Mistakes to Avoid
- Adding Too Much Flour: This is a common beginner mistake. It makes the dough stiff and difficult to knead, resulting in a dense, dry loaf. A slightly sticky dough is often a good thing!
- Incorrect Water Temperature: As mentioned, this is a yeast killer (or crippler).
- Under-Kneading: Leads to a dense, heavy bread with a poor crumb structure because gluten hasn’t developed properly.
- Skipping Rises or Rushing Them: This prevents proper gas development, leading to a flat, dense loaf.
- Underbaking: Results in a doughy, gummy interior and a pale crust. Ensure the internal temperature is reached.
- Cutting Hot Bread: This traps steam inside, making the crumb gummy and difficult to slice cleanly. Let it cool!
- Not Activating Yeast (for Active Dry): Always proof your active dry yeast to ensure it’s alive before adding other ingredients.
Frequently Asked Questions (FAQs) About Baking Bread
Q: How do I know if my yeast is active?
A: If using active dry yeast, proof it in warm water and sugar. After 5-10 minutes, it should be foamy and bubbly. If not, your yeast is likely dead, and you should start over with fresh yeast.
Q: How long does it take for bread to rise?
A: This varies greatly depending on room temperature, humidity, and yeast activity. The first rise can take 1-2 hours, and the second 30-60 minutes. Focus on the visual cues (doubled in size, puffy) rather than strict time limits.
Q: My bread is dense. What went wrong?
A: Common culprits for dense bread include: not enough kneading (under-developed gluten), not enough rise time (under-proofed), or too much flour in the dough.
Q: Can I use a stand mixer for kneading?
A: Absolutely! A stand mixer with a dough hook can make kneading much easier. Knead on medium-low speed for about 6-8 minutes, or until the dough is smooth and elastic and cleans the sides of the bowl.
Q: Why is my crust not crispy?
A: Often, lack of steam in the oven leads to a softer crust. You can try placing a pan of hot water on the bottom rack of your oven during baking, or spritzing the inside of your oven with water a few times during the first 10 minutes of baking.
Embrace the Journey!
Baking bread is a delightful journey of patience, touch, and transformation. Your first loaf might not be picture-perfect, but it will be your loaf – filled with your effort, your joy, and an incomparable homemade taste. Each loaf you bake will teach you something new about flour, yeast, and your own kitchen. So, roll up your sleeves, embrace the floury mess, and savor the incredible joy of baking your very own bread! Happy baking!
- 2LB Bread Maker Machine, OSIPOTO 17 in 1 Automatic Stainless Steel Bread Machine, Non-stick, Beginner-Friendly Controls, 15 Hour Timer, Easy to Clean Low Noise, High Success Rate for Homemade Bread
- Elite Gourmet EBM8103M Programmable Bread Maker Machine 3 Loaf Sizes, 19 Menu Functions Gluten Free White Wheat Rye French and more, 2 Lbs, Mint
- Amazon Basics Programmable Bread Maker, 2 Pound Non-Stick Automatic Bread Making Machine, 14 Settings for Breads, Doughs, Gluten-Free Options and More, LCD Display, White
FAQ
Q. Is ‘The Joy of Baking Bread: A Step-by-Step Guide’ suitable for complete beginners?
A. Yes, absolutely. This guide is specifically crafted for novices, offering incredibly clear, concise, and easy-to-follow instructions that assume no prior baking experience, ensuring a successful first loaf.
Q. What types of bread recipes are included in the guide?
A. The book covers a diverse range of popular and accessible breads, from fundamental white and whole wheat loaves to enriched doughs like challah and brioche, rustic sourdoughs, French baguettes, and even some delightful quick breads.
Q. Does the guide offer troubleshooting tips for common baking issues?
A. Indeed it does. A comprehensive section is dedicated to addressing common challenges such as dense bread, a lack of rise, or a tough crust, providing practical solutions and insightful explanations to help you master your baking skills.
Q. Are there illustrations or photos to accompany the step-by-step instructions?
A. Yes, the guide is richly illustrated with high-quality, full-color photographs for nearly every key step. These visual aids make the baking process remarkably clear and easy to follow, especially for intricate techniques like kneading or shaping.
Q. Beyond recipes, what other essential information does the book provide?
A. In addition to a wealth of recipes, ‘The Joy of Baking Bread’ offers crucial insights into understanding various ingredients, selecting and utilizing basic baking equipment, mastering fundamental techniques (like kneading and proofing), and proper storage methods for your homemade bread.
Q. Does the book include guidance on starting and maintaining a sourdough starter?
A. Yes, there is a dedicated and detailed chapter that walks you through the process of creating and maintaining your very own sourdough starter from scratch, along with several delicious recipes that showcase the versatility of active sourdough.