Essential Gadgets for Every Modern Kitchen: Your Guide to Culinary Convenience
- Umite Chef Kitchen Cooking Utensils Set, 33 pcs Non-Stick Silicone Cooking Kitchen Utensils Spatula Set with Holder, Wooden Handle Silicone Kitchen Gadgets Utensil Set (Khaki)
- Kitchen Utensil Set-Silicone Cooking Utensils-33 Kitchen Gadgets & Spoons for Nonstick Cookware-Silicone and Stainless Steel Spatula Set-Best Kitchen Tools, Useful Pots and Pans Accessories
- Astercook Kitchen Utensils set, 39 PCS Silicone Cooking Utensils Set with Wooden Handle, 446°F Heat Resistant Food Grade Utensil Sets, BPA Free Kitchen Gadgets Tools Set for Nonstick Cookware (Black)
The kitchen has always been the heart of the home, but in our fast-paced modern world, it’s also becoming a hub of efficiency and innovation. Gone are the days when cooking was solely a laborious task; today, a well-equipped kitchen, armed with the right gadgets, transforms meal preparation into an enjoyable, creative, and remarkably convenient experience.
From whipping up quick weeknight dinners to experimenting with gourmet recipes, the right kitchen gadgets can save you time, reduce effort, and even help you discover new culinary passions. This guide will walk you through the essential types of gadgets that every modern kitchen can benefit from, offering practical advice, usage tips, and common pitfalls to avoid.
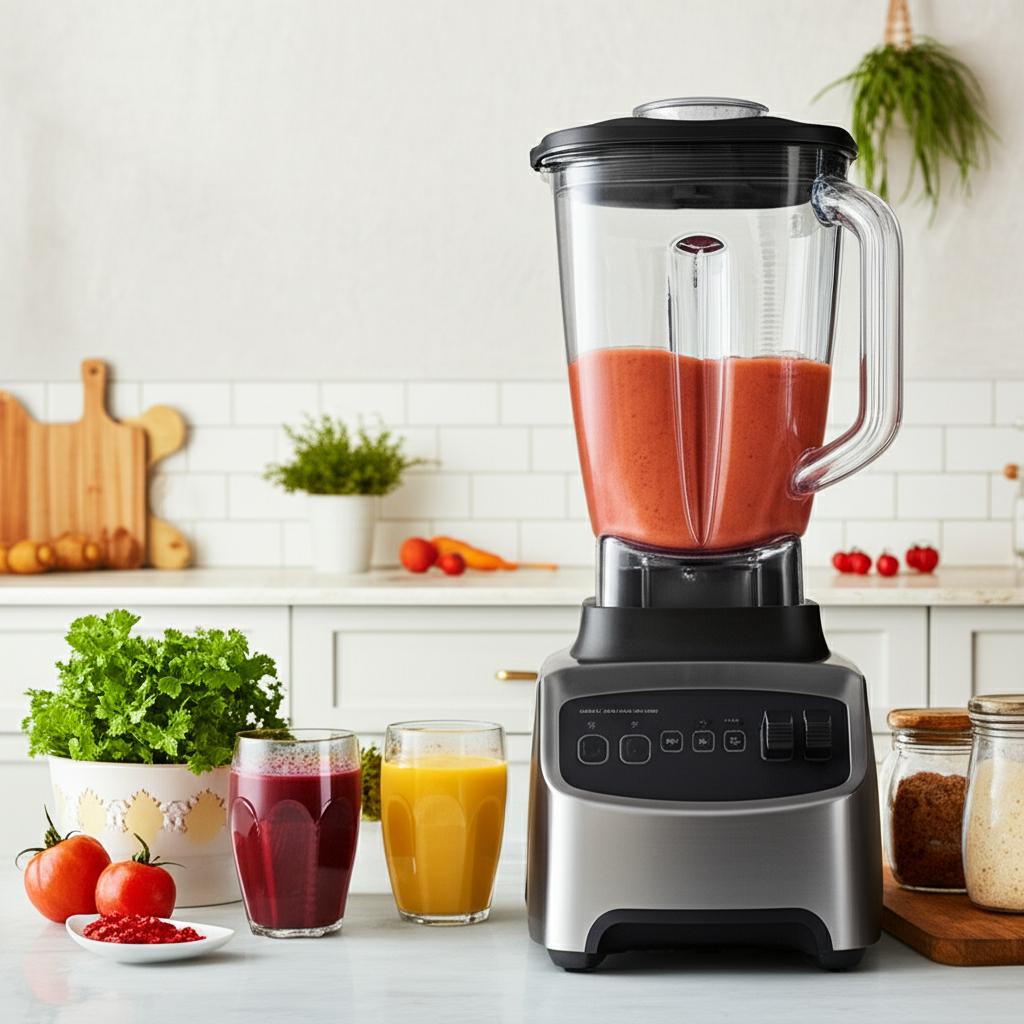
1. The Versatile Food Processor / High-Powered Blender
Often considered the workhorse of the modern kitchen, a robust food processor or a high-powered blender can tackle a multitude of tasks, from chopping and pureeing to mixing and even kneading dough.
Why it’s essential: It dramatically cuts down on prep time for tasks like slicing vegetables, mincing garlic, blending smoothies, making nut butters, or creating smooth sauces and soups.
Key Benefits:
* Speed & Efficiency: Rapidly processes ingredients.
* Consistency: Achieves uniform results (e.g., finely chopped onions).
* Versatility: Multiple functions in one appliance.
How to Use (General Steps):
1. Assemble: Ensure the bowl, blade, and lid are securely in place.
2. Prep Ingredients: Cut larger ingredients into manageable pieces that fit easily without jamming the blade.
3. Load: Place ingredients into the bowl, ensuring not to overfill (usually there’s a max fill line).
4. Process: Select the appropriate speed (pulse for control, continuous for smooth results).
5. Scrape Down: Periodically stop and scrape down the sides of the bowl to ensure even processing.
6. Clean Immediately: Disassemble and wash parts promptly to prevent food from drying on.
Tips for Maximizing Use:
* Use the Pulse Function: For chopping or coarse textures, pulse is your best friend. It gives you greater control than continuous blending.
* Don’t Overload: Filling the bowl past the recommended max line can strain the motor and lead to uneven processing.
* Add Liquids Gradually: When making sauces or purees, add liquids slowly through the feed tube while the machine is running for smoother results.
* Cleanliness is Key: Always clean the blade and bowl right after use to prevent food residue from hardening.
Common Mistakes to Avoid:
* Over-processing: Turning ingredients into mush when you only wanted a chop. Use the pulse button!
* Not cutting ingredients to size: Large chunks can get stuck or strain the motor.
* Ignoring the feed tube: Trying to force large items through the small opening.
* Improper cleaning: Leaving food to dry on the blades can make cleanup much harder and potentially damage parts.
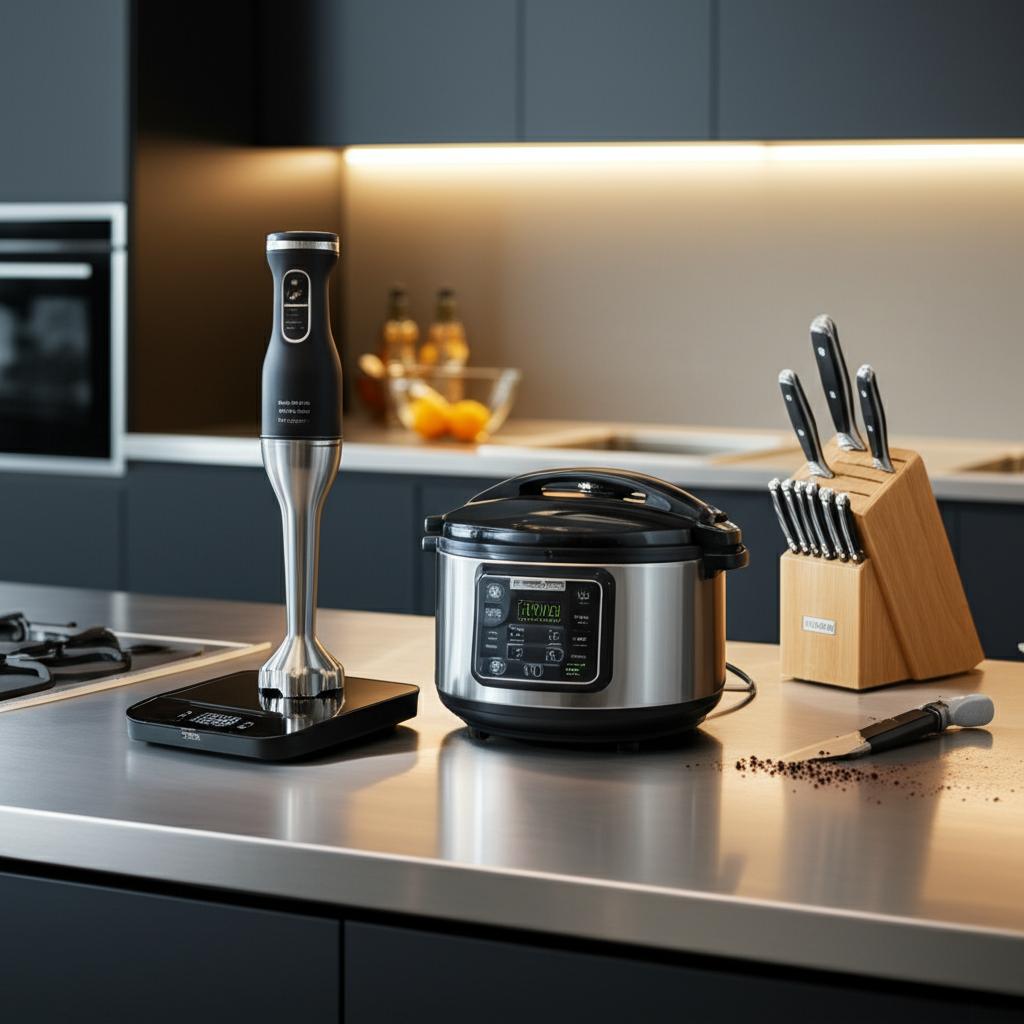
2. The Mighty Multi-Cooker (e.g., Electric Pressure Cooker)
A game-changer for busy households, the multi-cooker has soared in popularity for its ability to combine multiple appliances into one, significantly speeding up cooking times while locking in flavor.
Why it’s essential: It can function as a pressure cooker, slow cooker, rice cooker, steamer, sauté pan, and more. Perfect for one-pot meals and tenderizing tough cuts of meat quickly.
Key Benefits:
* Speed: Pressure cooking dramatically reduces cooking time.
* Convenience: Many functions in a single device, freeing up counter space.
* Flavor Retention: Trapped steam helps food retain moisture and flavor.
* Less Cleanup: Often, a single pot is all you need.
How to Use (General Steps):
1. Add Ingredients: Place your food and liquids into the inner pot.
2. Secure Lid: Place the lid on, ensuring it’s properly aligned and sealed. The float valve must be clean and able to move freely.
3. Set Vent: Turn the steam release handle to the “sealing” position.
4. Select Program: Choose the desired cooking function (e.g., Pressure Cook, Slow Cook, Sauté) and set the time and pressure level if applicable.
5. Cook: The cooker will build pressure, cook, and then beep when done.
6. Release Pressure: Use either the Natural Release (NPR) method (letting pressure dissipate slowly, ideal for meats/soups) or the Quick Release (QR) method (manually opening the vent, ideal for vegetables/foods that might overcook). Always use a long-handled spoon or tongs to move the vent, keeping your hand away from the steam.
7. Serve & Clean: Remove food and clean the inner pot.
Tips for Maximizing Use:
* Read Your Manual: Each model has specific safety instructions and nuances. Understand your machine.
* Deglaze After Sautéing: If you sauté food in the pot, always deglaze the bottom with a liquid (water, broth, wine) and scrape up any stuck bits before pressure cooking to prevent “burn” warnings.
* Don’t Overfill: Never fill past the “Max Fill” line, especially when pressure cooking, and even less so for expanding foods like rice or beans.
* Use the Right Release Method: Natural Release for foamy foods or delicate items, Quick Release for quicker cooking or vegetables.
Common Mistakes to Avoid:
* Ignoring the “Max Fill” line: Overfilling can lead to clogging the vent, which is a safety hazard.
* Forgetting to seal the steam release valve: The cooker won’t come to pressure.
* Forcing the lid open: Never try to open the lid until all pressure has been safely released.
* Not checking the sealing ring: Ensure it’s clean and properly seated for a good seal.
3. The Air Fryer Phenomenon
Air fryers have taken kitchens by storm, offering a healthier way to enjoy crispy, “fried” foods with significantly less oil. They are essentially compact convection ovens that circulate hot air rapidly around food.
Why it’s essential: Delivers a satisfying crunch to everything from fries and chicken wings to roasted vegetables and even baked goods, using only a fraction of the oil traditionally required.
Key Benefits:
* Healthier Frying: Uses hot air instead of deep oil for crispy results.
* Speed: Cooks food faster than a conventional oven due to concentrated heat.
* Convenience: Easy to use and clean compared to traditional deep frying.
* Versatility: Great for reheating leftovers, roasting, and even some baking.
How to Use (General Steps):
1. Preheat (Optional but Recommended): Turn on the air fryer to your desired temperature for a few minutes. This ensures immediate crisping.
2. Prepare Food: Lightly toss your food with a small amount of oil (about 1-2 teaspoons for a batch of fries) and any seasonings. A little oil goes a long way in an air fryer.
3. Arrange Food: Place food in a single layer in the basket. Do not overcrowd.
4. Set Time & Temperature: Cook according to your recipe.
5. Shake/Flip: For even cooking and browning, shake the basket or flip items halfway through the cooking time.
6. Check Doneness: Cook until golden brown and cooked through.
7. Serve & Clean: Carefully remove food and clean the basket and drawer.
Tips for Maximizing Use:
* Don’t Overcrowd the Basket: This is the most common mistake. Air needs to circulate freely for food to crisp. Work in batches if necessary.
* Lightly Oil for Best Results: While advertised as “oil-free,” a small amount of oil helps achieve a better crispy texture and color. Use an oil sprayer for even distribution.
* Pat Food Dry: For very moist foods (like fresh cut potatoes), pat them dry before adding oil for maximum crispiness.
* Shake or Flip Frequently: This ensures all sides get exposed to the hot air.
* Use Parchment Paper Liners (with caution): These can make cleanup easier, but never preheat the air fryer with just a liner in it as it can blow into the heating element and catch fire. Always place food on top of the liner.
Common Mistakes to Avoid:
* Overcrowding: Leads to steaming instead of frying, resulting in soggy food.
* Not preheating: Food won’t crisp as quickly or evenly.
* Skipping the shake/flip: Uneven cooking and browning.
* Using too much oil: Can make food greasy and create excessive smoke.
4. The Precision Power of a Stand Mixer
For baking enthusiasts and serious home cooks, a stand mixer is an invaluable tool. It automates repetitive tasks like mixing, kneading, and whipping, freeing up your hands for other prep.
Why it’s essential: Provides consistent, thorough mixing for batters, doughs, and meringues, which is difficult to achieve by hand. It’s especially useful for baking large quantities or complex recipes.
Key Benefits:
* Consistent Results: Achieves uniform texture and aeration.
* Powerful: Can handle heavy doughs without straining.
* Hands-Free: Leaves you free to do other tasks while it mixes.
* Versatility: With various attachments, it can whip, knead, mix, and even grind or make pasta.
How to Use (General Steps):
1. Attach Bowl & Beater: Secure the mixing bowl and the appropriate attachment (paddle for batters, whisk for whipping, dough hook for kneading).
2. Add Ingredients: Place ingredients into the bowl.
3. Start Slow: Begin mixing on the lowest speed to incorporate ingredients without splashing.
4. Increase Speed: Gradually increase speed as needed for your recipe.
5. Scrape Sides: Periodically stop the mixer and scrape down the sides of the bowl with a spatula to ensure all ingredients are thoroughly incorporated.
6. Monitor Consistency: Mix until the desired texture is achieved.
7. Clean Attachments & Bowl: Wash immediately after use.
Tips for Maximizing Use:
* Know Your Attachments: Use the whisk for light, airy mixtures (egg whites, whipped cream); the paddle for general mixing (cookie dough, cake batter); and the dough hook for kneading bread dough.
* Chill Bowl & Whisk for Whipping: For the best whipped cream or meringues, chill your mixing bowl and whisk attachment in the freezer for 10-15 minutes before use.
* Add Dry Ingredients Slowly: When adding flour or other dry ingredients to a wet mixture, do so gradually on a low speed to prevent a “flour cloud” and ensure even incorporation.
* Don’t Overmix: Especially with baked goods, overmixing can develop too much gluten, leading to tough cookies or dry cakes. Mix just until combined.
Common Mistakes to Avoid:
* Adding ingredients too quickly: Can cause splashes and uneven mixing.
* Not scraping down the bowl: Leaves unmixed ingredients stuck to the bottom or sides.
* Overmixing: Particularly with doughs and batters, leading to undesirable textures.
* Ignoring the capacity limits: Overfilling can strain the motor and lead to mess.
5. The Indispensable Digital Kitchen Scale
While not an electric gadget in the same vein as the others, a digital kitchen scale is a must-have for anyone serious about baking or portion control. It offers a level of precision that measuring cups simply cannot match.
Why it’s essential: Provides accurate measurements by weight, crucial for consistent baking results where ratios matter most. Also excellent for portion control in cooking or dieting.
Key Benefits:
* Precision: More accurate than volume measurements (cups/spoons), especially for flour and other dry ingredients.
* Consistent Results: Leads to more reliable outcomes in baking.
* Less Mess: You can often measure multiple ingredients into the same bowl using the tare function.
* Portion Control: Easily measure precise serving sizes.
How to Use (General Steps):
1. Place Scale on Flat Surface: Ensure it’s stable.
2. Turn On: Press the power button.
3. Select Units: Choose your desired unit (grams, ounces, pounds, milliliters).
4. Place Container: Put your mixing bowl or container on the scale.
5. Tare (Zero Out): Press the “Tare” or “Zero” button to reset the scale to zero, effectively subtracting the weight of the container.
6. Add First Ingredient: Add your first ingredient until the desired weight is displayed.
7. Tare & Add Next: Press “Tare” again, and then add your next ingredient. Repeat until all ingredients are measured.
8. Clean: Wipe clean after use.
Tips for Maximizing Use:
* Always Tare: Make sure you tare the scale to zero before adding each new ingredient if you’re measuring multiple items in the same bowl.
* Measure Directly in Bowl: For baking, measure dry ingredients directly into your mixing bowl to minimize cleanup.
* Precision for Liquids: While cups work for liquids, a scale can be more precise for liquids that are part of a weight-based recipe.
* Portion Control: Use it to accurately measure protein, carbs, or fats for dietary needs.
Common Mistakes to Avoid:
* Forgetting to tare: Leading to inaccurate measurements as the container’s weight or previous ingredients’ weights are included.
* Not using the correct unit: Ensure you’re measuring in grams if the recipe calls for grams, not ounces.
* Not cleaning after use: Spills can damage the electronic components over time.
Other Noteworthy Gadgets for the Modern Kitchen:
- Immersion Blender: Perfect for pureeing soups directly in the pot, making sauces, or blending small batches. Easy to use and clean.
- Electric Kettle: Rapidly boils water for tea, coffee, or for starting pasta water. Many have temperature control for specific brewing needs.
- Smart Coffee Maker: Programmable to brew your coffee before you wake up, some even connect to apps for remote starting.
General Tips for Choosing & Using Kitchen Gadgets:
- Assess Your Needs: Don’t just buy a gadget because it’s popular. Think about what you cook most often and which appliance would genuinely make your life easier.
- Consider Counter Space & Storage: Modern kitchens might be efficient, but space is often at a premium. Choose gadgets that fit comfortably on your counter or can be stored easily.
- Look for Versatility: Gadgets that perform multiple functions (like a multi-cooker or a food processor with various attachments) offer more bang for your buck and save space.
- Ease of Cleaning: If a gadget is difficult to clean, you’re less likely to use it. Look for models with dishwasher-safe parts or simple wipe-down surfaces.
- Quality Over Quantity: It’s better to invest in one high-quality, durable gadget that performs well than several cheap ones that break easily or underperform.
- Read the Manual: Yes, seriously! The manual contains crucial safety information, tips for optimal performance, and cleaning instructions specific to your model.
Embracing the right kitchen gadgets is about more than just convenience; it’s about empowering yourself in the kitchen, fostering creativity, and making healthy eating habits more accessible. By understanding how to effectively use these essential tools and avoiding common pitfalls, you’ll transform your cooking experience and unlock a world of culinary possibilities. Happy cooking!
- Umite Chef Kitchen Cooking Utensils Set, 33 pcs Non-Stick Silicone Cooking Kitchen Utensils Spatula Set with Holder, Wooden Handle Silicone Kitchen Gadgets Utensil Set (Khaki)
- Kitchen Utensil Set-Silicone Cooking Utensils-33 Kitchen Gadgets & Spoons for Nonstick Cookware-Silicone and Stainless Steel Spatula Set-Best Kitchen Tools, Useful Pots and Pans Accessories
- Astercook Kitchen Utensils set, 39 PCS Silicone Cooking Utensils Set with Wooden Handle, 446°F Heat Resistant Food Grade Utensil Sets, BPA Free Kitchen Gadgets Tools Set for Nonstick Cookware (Black)
FAQ
Q. What makes an air fryer an essential modern kitchen gadget?
A. Air fryers offer a healthier way to enjoy fried foods with significantly less oil, providing crispy results. They are also versatile for roasting, baking, and reheating, making them a compact, multi-functional appliance perfect for quick and convenient meals.
Q. Is a stand mixer truly necessary if I don’t bake frequently?
A. While excellent for baking, stand mixers are incredibly versatile for everyday cooking. With various attachments, they can knead dough, whip cream, mash potatoes, shred chicken, and even make pasta or grind meat, saving significant time and effort on many common prep tasks.
Q. Why choose an immersion blender over a traditional countertop blender?
A. Immersion blenders are ideal for blending directly in pots or bowls, perfect for soups, sauces, and smoothies without the need to transfer hot liquids. They are also compact, easy to clean, and take up much less counter or storage space than full-sized blenders, making them highly convenient.
Q. How does a smart kitchen scale enhance my cooking experience?
A. A smart kitchen scale provides precise measurements for consistent results, which is especially crucial for baking. Many models connect to apps, offering nutritional information, converting units, and guiding you through recipes step-by-step, thereby reducing waste and improving accuracy.
Q. What are the main benefits of owning a multi-cooker like an Instant Pot?
A. Multi-cookers combine several appliances into one, typically functioning as a pressure cooker, slow cooker, rice cooker, steamer, sauté pan, and yogurt maker. They significantly speed up cooking times for many dishes, making healthy, home-cooked meals more accessible on busy schedules and simplifying cleanup with one-pot solutions.
Q. When is a food processor more beneficial than just using a knife for prep?
A. A food processor excels at quickly chopping, slicing, grating, shredding, and pureeing large quantities of ingredients, tasks that would be time-consuming and laborious by hand. It is particularly useful for making doughs, sauces, dips, nut butters, and processing vegetables for salads or stews in bulk.