The Art of Dehydrating Food: Preserve Your Produce with Ease!
- COSORI Food Dehydrator, Bigger Than 7 Trays With Large 6.5″ Drying Space, 600W Power Saves More Time Than 480W, 165°F Dehydrated Dryer for Jerky, Dog Treats, Herbs, Meat, Fruit, and Yogurt, Silver
- Food Dehydrator 12 Trays Stainless Steel – 850W Large Dryer for Jerky, Fruit, Meat, Herbs, Mushroom with Digital Timer & Glass Door
- Magic Mill Food Dehydrator Machine | 5 Stackable Stainless Steel Trays Jerky Dryer with Digital Adjustable Timer & Temperature Control – Electric Food Preserver for Fruits, Veggies, Meats & Dog Treats
Imagine a pantry overflowing with vibrant, nutrient-packed snacks and ingredients, all preserved at the peak of freshness from your garden or farmer’s market haul. This isn’t a dream – it’s the reality you can create with the time-honored technique of food dehydration. Dehydrating food is an accessible and incredibly rewarding way to extend the shelf life of your favorite fruits, vegetables, and herbs, locking in their flavors and nutrients for months, or even years, to come.
Gone are the days of only thinking about crunchy fruit leathers or savory jerky. Modern dehydration opens up a world of possibilities for healthy snacking, meal prep, and even gourmet cooking. Whether you’re a seasoned gardener looking to reduce waste, a health-conscious individual aiming for homemade snacks, or simply curious about food preservation, this guide will walk you through the art of drying food.
Why Dehydrate Your Food? The Benefits Are Abundant!
Dehydration is more than just a method of preservation; it’s a smart choice for your kitchen, your wallet, and your health.
- Extend Shelf Life Dramatically: By removing moisture, you inhibit the growth of bacteria, yeasts, and molds that cause spoilage. Dehydrated foods can last for months to several years when stored properly.
- Lock in Nutrients: While some heat-sensitive vitamins can be reduced, dehydration generally retains a high percentage of vitamins, minerals, and fiber compared to other preservation methods like canning.
- Reduce Food Waste: Have an abundance of garden produce? Dehydration is a fantastic way to salvage surplus fruits and vegetables before they go bad, saving you money and reducing your environmental footprint.
- Save Storage Space: Dehydrated foods are compact and lightweight, making them ideal for small pantries, camping, hiking, or emergency food supplies. Think about a bag of dried apple slices versus a bushel of fresh apples!
- Create Healthy, Portable Snacks: Say goodbye to processed snacks! Homemade dried fruits and veggie chips are naturally sweet, savory, and free from added sugars, preservatives, or artificial ingredients.
- Intensify Flavor: Removing water concentrates the natural sugars and flavors, leading to a surprisingly rich and delicious taste.
- Cost-Effective: Drying your own produce is often cheaper than buying pre-packaged dried goods from the store.
What Can You Dehydrate? Almost Anything!
The versatility of dehydration is truly astonishing. Here’s a glimpse of what you can preserve:
- Fruits: Apples, bananas, berries (strawberries, blueberries, raspberries), mangoes, peaches, apricots, cherries, pineapple, citrus slices, grapes (for raisins).
- Vegetables: Carrots, peas, corn, green beans, tomatoes, bell peppers, zucchini, leafy greens (kale, spinach), mushrooms, onions.
- Herbs: Basil, oregano, thyme, rosemary, parsley, mint.
- Other: Fruit leathers (pureed fruit dried into sheets), vegetable powders (dried and ground vegetables for seasoning or thickening).
Essential Equipment (No Specific Brands Needed!)
You don’t need a huge, expensive setup to start dehydrating. Here’s what’s typically involved:
- A Food Dehydrator: This is the most efficient and recommended option for consistent results. It circulates warm air at a controlled temperature.
- Sharp Knife or Mandoline: For uniform slicing.
- Cutting Boards: Multiple are helpful.
- Parchment Paper or Non-Stick Sheets: For lining dehydrator trays, especially for sticky fruits or purees.
- Airtight Containers: Glass jars, vacuum-seal bags, or heavy-duty freezer bags for long-term storage.
Alternatively, you can use your oven on its lowest setting, propping the door open slightly to allow moisture to escape. However, ovens are less efficient and harder to control for dehydration, often leading to less consistent results.
The Step-by-Step Dehydration Process: Your Guide to Perfection
Ready to get started? Follow these steps for successful food preservation!
Step 1: Preparation is Key!
- Start with Fresh, Ripe Produce: This is the most crucial step! Select produce that is at its peak of ripeness, free from bruises, mold, or decay. Quality in equals quality out.
- Wash Thoroughly: Rinse all fruits and vegetables under cold, running water. Gently scrub if necessary.
- Trim and Core: Remove stems, cores, seeds, pits, and any bruised or damaged spots.
Step 2: Slice and Dice (Uniformity is Crucial!)
- Slice Evenly: This is perhaps the most important technique for successful dehydration. Use a sharp knife or mandoline to slice your produce into uniform thicknesses. Uneven slices will dry at different rates, leading to some pieces being over-dried and others still damp (and prone to spoilage).
- Fruits: Aim for 1/4-inch to 1/2-inch thick slices.
- Vegetables: Generally thinner, around 1/8-inch to 1/4-inch.
- Berries/Small Items: Can often be dried whole or halved.
Step 3: Pre-Treatment (Optional, but Recommended for Some!)
While not always necessary, pre-treating certain foods helps preserve color, prevent browning, and improve nutrient retention.
- For Fruits (Prevent Browning):
- Acid Bath: Soak slices in a solution of lemon juice (1 part) and water (4 parts) for 5-10 minutes. This is especially good for apples, pears, peaches, and bananas.
- Ascorbic Acid: Use a commercial anti-darkening powder (often pure vitamin C) mixed with water according to package directions.
- For Vegetables (Blanching):
- Blanching: This involves briefly boiling or steaming vegetables before drying. It helps stop enzyme activity that causes flavor and color loss during storage.
- Boil-Blanching: Immerse vegetables in boiling water for a short time (1-5 minutes, depending on the vegetable), then immediately plunge them into an ice bath to stop the cooking process.
- Steam-Blanching: Place vegetables in a steamer basket over boiling water until tender-crisp.
- Drain Thoroughly: After blanching, drain the vegetables completely and pat dry before placing them on trays.
- Blanching: This involves briefly boiling or steaming vegetables before drying. It helps stop enzyme activity that causes flavor and color loss during storage.
Step 4: Load Your Dehydrator/Oven
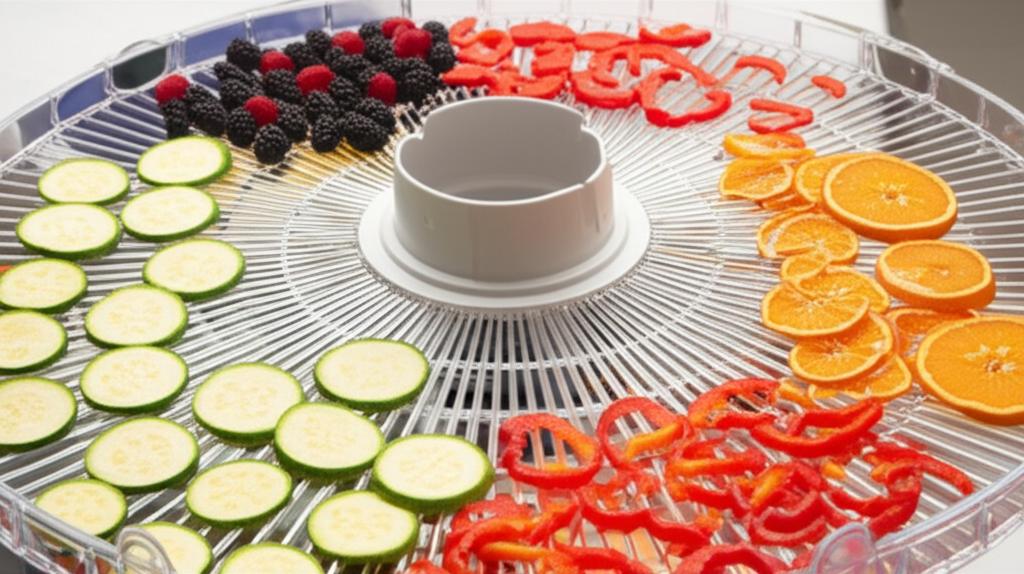
- Single Layer: Arrange your prepared produce in a single layer on the dehydrator trays. Do not overlap or overcrowd the trays, as this will block airflow and lead to uneven drying.
- Allow Space: Leave a small amount of space between pieces to ensure adequate air circulation.
Step 5: The Drying Game (Patience is a Virtue!)
- Set the Temperature:
- Fruits: Typically dried at 135°F (57°C).
- Vegetables: Also around 125-135°F (52-57°C).
- Herbs: Lower temperatures, around 95-105°F (35-40°C), to preserve delicate oils.
- Drying Time Varies: Dehydration can take anywhere from 6 to 24+ hours, depending on the food’s moisture content, thickness, ambient humidity, and your dehydrator.
- Check for Doneness:
- Fruits: Should be leathery and pliable, with no sticky or moist spots. You should not be able to squeeze out any moisture.
- Vegetables: Should be brittle and hard when fully dry. They should snap easily.
- Herbs: Should be crispy and crumble easily when rubbed between your fingers.
- Rotate Trays: For most dehydrators, rotate the trays every few hours to ensure even drying. Place trays from the bottom to the top and vice versa.
Step 6: Conditioning – The Secret to Success
This step is crucial for preventing mold and ensuring long-term storage!
- What is Conditioning? It’s the process of allowing any remaining moisture in the food to equalize throughout all the pieces. Even if food feels dry, some internal moisture pockets might exist.
- How to Condition:
- Let the dried food cool completely.
- Place the cooled food loosely in clean, airtight glass jars.
- Shake the jars daily for 7-10 days. This redistributes any residual moisture.
- Observe Closely: If you see any condensation forming inside the jar during this period, or if any pieces feel damp, they are not fully dry. Return them to the dehydrator immediately for more drying time. Do not skip this step!
Step 7: Storage – Keep it Fresh!
- Airtight is Key: Once conditioned, store your perfectly dried food in airtight containers like glass jars with tight-fitting lids, vacuum-sealed bags, or heavy-duty freezer bags.
- Cool, Dark, and Dry: Store containers in a cool (below 70°F/21°C), dark, and dry place, away from direct sunlight, heat, and moisture. A pantry or cupboard is ideal.
- Label and Date: Always label your containers with the food type and the date it was dried. This helps you keep track of your stock and ensures you use older items first.
- Shelf Life: Properly dried and stored foods can last anywhere from 1-5 years, though flavor and nutrient quality may slowly diminish over time. Aim to use them within a year for best quality.
Pro Tips for Dehydrating Excellence
- Use Fresh, Ripe Produce: Reiterating this because it’s paramount. The better the starting ingredient, the better the end product.
- Don’t Overload: Give your food room to breathe. Good airflow is essential for efficient and even drying.
- Rotate Trays Regularly: Even if your dehydrator boasts even heating, a quick tray rotation helps.
- Check for Doneness Often: Towards the end of the drying cycle, check your food frequently to prevent over-drying, which can make it brittle and less palatable.
- Keep Records: Note down the type of food, its starting weight (optional), thickness, pre-treatment used, temperature, and drying time. This helps you refine your process for future batches.
- Cleanliness Matters: Always work with clean hands, utensils, and equipment to prevent contamination.
Common Mistakes to Avoid
Even seasoned dehydrators can make these errors. Be aware!
- Uneven Slicing: As mentioned, this is a big one. Pieces that are too thick will not dry completely, leading to spoilage.
- Overcrowding Trays: This is another major culprit for mold. Resist the urge to pack too much onto trays. Air needs to circulate.
- Insufficient Drying: The most common cause of mold in stored dehydrated food. Always ensure food is thoroughly dry and properly conditioned before storage.
- Skipping Pre-Treatment for Prone Foods: For items like apples or potatoes, skipping the acid bath means they will brown and look unappetizing, even if still safe to eat.
- Improper Storage: Storing dried food in open containers, in humid environments, or in direct sunlight will quickly compromise its quality and safety.
- Lack of Patience: Dehydrating takes time. Resist the temptation to crank up the temperature to speed things up, as this can cook the outside of the food while leaving the inside moist.
Embrace the Art of Dehydrating!
Dehydrating food is a wonderfully rewarding skill that connects you more deeply with your food, reduces waste, and provides a continuous supply of healthy, shelf-stable ingredients. It’s truly an art form that, with a little practice and patience, you’ll master in no time. So, gather your fresh produce, set up your dehydrator, and begin your journey into the delicious world of homemade dried foods! Your pantry (and your taste buds) will thank you.
- COSORI Food Dehydrator, Bigger Than 7 Trays With Large 6.5″ Drying Space, 600W Power Saves More Time Than 480W, 165°F Dehydrated Dryer for Jerky, Dog Treats, Herbs, Meat, Fruit, and Yogurt, Silver
- Food Dehydrator 12 Trays Stainless Steel – 850W Large Dryer for Jerky, Fruit, Meat, Herbs, Mushroom with Digital Timer & Glass Door
- Magic Mill Food Dehydrator Machine | 5 Stackable Stainless Steel Trays Jerky Dryer with Digital Adjustable Timer & Temperature Control – Electric Food Preserver for Fruits, Veggies, Meats & Dog Treats
FAQ
Q. What are the primary benefits of dehydrating food as covered in ‘The Art of Dehydrating Food’?
A. The book highlights several key benefits, including extended shelf-life for seasonal produce, preservation of nutrients and flavors, reduced food waste, creation of lightweight and portable snacks for hiking or camping, and potential cost savings by buying in bulk when produce is in season.
Q. What essential equipment is recommended for beginners in ‘The Art of Dehydrating Food’?
A. For beginners, the book typically recommends a good quality food dehydrator (either tray or box style), sharp knives for slicing, cutting boards, airtight storage containers (jars, vacuum seal bags), and possibly pre-treatment solutions like lemon juice or citric acid for certain fruits.
Q. How do I know when my food is properly dehydrated and safe for long-term storage, according to the book’s guidelines?
A. ‘The Art of Dehydrating Food’ emphasizes checking for proper dryness. Fruits should be leathery and pliable with no sticky spots, vegetables should be brittle and snap easily, and meats should be tough and leathery. There should be no moisture present, as this can lead to spoilage. The book also discusses the “conditioning” process to ensure even moisture distribution after initial drying.
Q. Does ‘The Art of Dehydrating Food’ cover pre-treatment methods, and why are they important?
A. Yes, the book extensively covers various pre-treatment methods such as blanching for vegetables, and using acid baths (lemon juice, citric acid, or fruit fresh) for fruits. These methods are crucial for preserving color, preventing enzymatic browning, reducing spoilage, and ensuring better nutrient retention in the dehydrated product.
Q. What are the best practices for storing dehydrated food to maximize its shelf life, as advised in the guide?
A. The book advises storing dehydrated food in airtight containers (such as glass jars with airtight lids or vacuum-sealed bags) in a cool, dark, and dry place. Protecting the food from light, air, and moisture is paramount to prevent rehydration and spoilage, ensuring it can last for months or even years.
Q. Can all types of produce be dehydrated, or are there specific recommendations in ‘The Art of Dehydrating Food’?
A. While many types of produce can be dehydrated, ‘The Art of Dehydrating Food’ typically provides specific recommendations and preparation methods for different categories. It often advises against dehydrating very high-fat foods or those with extremely high water content that might not achieve optimal results. The book usually details best practices for fruits, vegetables, herbs, and even some meats, outlining what works best and what to avoid.
Q. How does ‘The Art of Dehydrating Food’ guide users on rehydrating dried produce for cooking?
A. The book typically provides guidelines on rehydrating dried produce by soaking it in water, broth, or other liquids. It specifies different soaking times and temperatures for various foods, emphasizing that rehydrated food can be used effectively in stews, soups, casseroles, or as side dishes, regaining much of its original texture and flavor.