Homemade Bread: Beyond the Basics – Unlock Your Inner Artisan Baker!
- Saint Germain Bakery Premium Round Bread Banneton Basket with Liner – Perfect Brotform Proofing Basket for Making Beautiful Bread (9 inch)
- Banneton Bread Proofing Basket, Kook, Sourdough Proofing Bread Basket, Bread Banneton Proofing, Artisan Sourdough Making Baskets, 9 Inch Rattan Baskets and Cloth Liners, Set of 2, Round
- Dimpola Banneton Bread Proofing Basket Banneton Basket Set Sourdough Proofing Basket Round Proofing Bowls Handmade Rattan Baskets and Liners (Round 9 inch set of 2)
You’ve mastered the delightful aroma of fresh bread filling your kitchen. You’ve conquered the basic loaf, and your family raves about your homemade goodness. But what if we told you there’s a whole new world of bread-making waiting to be explored? A realm where tangy sourdough, airy focaccia, and crusty artisan boules become your everyday masterpieces?
Welcome to ‘Homemade Bread: Beyond the Basics’! This detailed guide will equip you with the knowledge, techniques, and confidence to elevate your baking from comforting to extraordinary. We’ll dive deeper into ingredients, explore advanced methods, and help you troubleshoot common hurdles, transforming you into a true artisan baker. Get ready to impress yourself (and everyone else)!
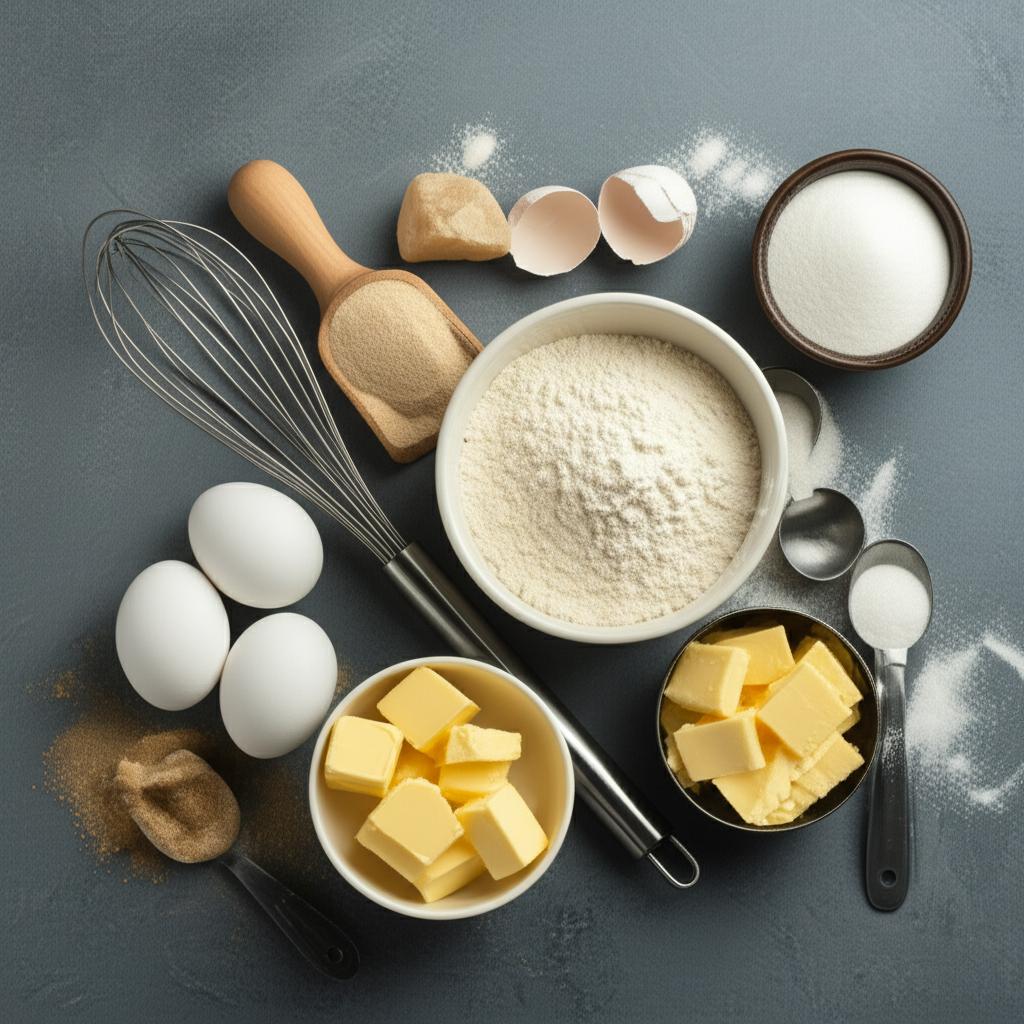
1. The Flour Power-Up: Beyond All-Purpose
While all-purpose flour is a versatile workhorse, venturing into different flour types opens up a universe of textures and flavors. Choosing the right flour is fundamental to achieving the specific qualities of various breads.
- Bread Flour: This is your next best friend. It has a higher protein content (typically 12-14%) than all-purpose flour, which means it develops stronger gluten. Stronger gluten equals better structure, chew, and a more open crumb (those lovely holes) in breads like baguettes or ciabatta.
- Whole Wheat Flour: Adds a nutty flavor, increased fiber, and a denser crumb. It absorbs more water than white flour, so you might need to adjust your hydration. Start by substituting 25-50% of your white flour with whole wheat before going 100%.
- Rye Flour: Known for its distinctive, earthy flavor and sticky texture. Rye has very little gluten, so it produces a denser loaf. Often mixed with bread flour to provide structure. Perfect for robust, hearty breads.
- Specialty Flours (Spelt, Einkorn, Kamut): These ancient grains offer unique flavors and nutritional profiles. They often behave differently from modern wheat, sometimes requiring gentler handling. Experimentation is key!
2. Elevating Your Dough: Enrichments & Leavening Mastery
Moving beyond water, flour, yeast, and salt, consider what you can add to your dough to change its character.
Enriching Your Loaf
- Milk, Butter, & Eggs: These ingredients add richness, tenderness, and a beautiful golden crust.
- Milk: Contributes to a softer crumb and slightly sweeter flavor. Great for sandwich breads, dinner rolls, and brioche.
- Butter: Adds incredible flavor and a melt-in-your-mouth texture. Essential for brioche, challah, and milk bread.
- Eggs: Provide richness, structure, and a lovely yellow hue. They contribute to a more cake-like crumb.
- How to Use: Incorporate softened butter and eggs after the initial mixing, kneading them in gradually until fully absorbed.
Embracing Sourdough: The Ultimate Leap
Sourdough bread isn’t just a trend; it’s a traditional method that produces bread with unparalleled flavor, texture, and digestibility. It relies on a “sourdough starter,” a live fermented culture of wild yeasts and bacteria.
Why Sourdough?
- Complex Flavor: Develops a characteristic tang and depth not found in commercial yeast breads.
- Open Crumb: Often results in a beautiful, airy interior with irregular holes.
- Improved Digestibility: The long fermentation breaks down starches and gluten, making it easier for some to digest.
Basic Sourdough Process (Simplified Steps for an Existing Starter):
- Activate Your Starter (Feed): The night before baking, feed your starter with flour and water. It should be active and bubbly, ready to use in 4-12 hours depending on temperature.
- Autolyse (Optional but Recommended): Mix flour and water and let it rest for 30-60 minutes. This hydrates the flour and begins gluten development without kneading.
- Mix Dough: Add your active starter, salt, and any remaining ingredients. Mix until just combined.
- Bulk Fermentation (First Rise): This is where the magic happens! Over several hours (often 4-8+ depending on temperature), the dough develops flavor and strength through a series of “stretch and folds.” Instead of vigorous kneading, gently stretch a portion of the dough up and fold it over itself, rotating the bowl each time. Repeat 4-6 times every 30-60 minutes.
- Pre-Shape & Bench Rest: Gently shape your dough into a loose ball and let it rest for 20-30 minutes. This relaxes the gluten before final shaping.
- Final Shape: Shape your dough into your desired form (boule, batard, etc.). Tension is key here – create a tight skin on the outside.
- Cold Proof (Second Rise): Place the shaped dough in a floured proofing basket (banneton) or bowl, cover, and refrigerate for 12-24 hours. This slows down fermentation, allowing flavors to deepen and making the dough easier to score and handle.
- Bake: Preheat your oven with a Dutch oven or baking stone. Score your cold dough, transfer to the hot vessel, and bake with steam (Dutch oven lid on, or spray water/ice cubes for baking stone) for the first part, then lid off for crust development.
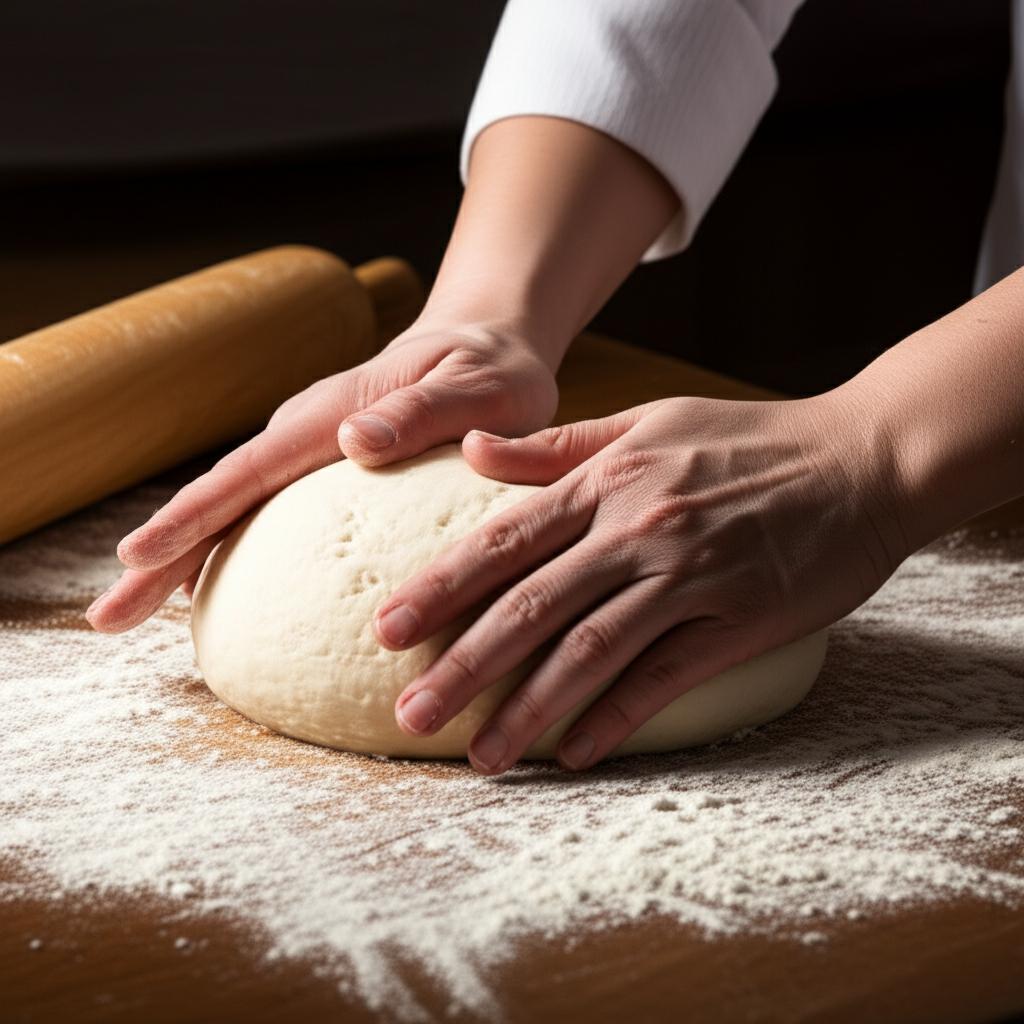
3. Mastering the Craft: Advanced Techniques
Beyond simply mixing and letting it rise, these techniques will refine your bread.
The Windowpane Test: Knowing Your Gluten
- What it is: A visual test to determine if your dough has developed enough gluten.
- How to do it: Pinch off a small piece of dough. Gently stretch it between your fingers. If you can stretch it thin enough to see light through it without tearing, like a “windowpane,” your gluten is well-developed. If it tears easily, keep kneading!
Stretch & Fold: The Gentle Giant
- When to use: Ideal for high-hydration doughs (like ciabatta, sourdough) where traditional kneading is messy. It builds strength and aerates the dough.
- How to do it: With wet hands, gently grab a portion of the dough from the edge of the bowl, stretch it upwards, and fold it over to the center. Rotate the bowl and repeat 3-4 more times. Cover and rest for 30-60 minutes between sets. Repeat 3-5 times during bulk fermentation.
Longer Fermentation & Cold Proofing: Flavor & Ease
- Benefits:
- Deeper Flavor: More time allows yeasts and bacteria to produce complex aromatic compounds.
- Improved Texture: Stronger gluten network, better crumb.
- Easier Handling: Cold dough is firmer and less sticky, making it simpler to score and transfer.
- How to do it: After shaping, place your dough (in a proofing basket or bowl) into the refrigerator for anywhere from 8 to 24 hours. This drastically slows down fermentation.
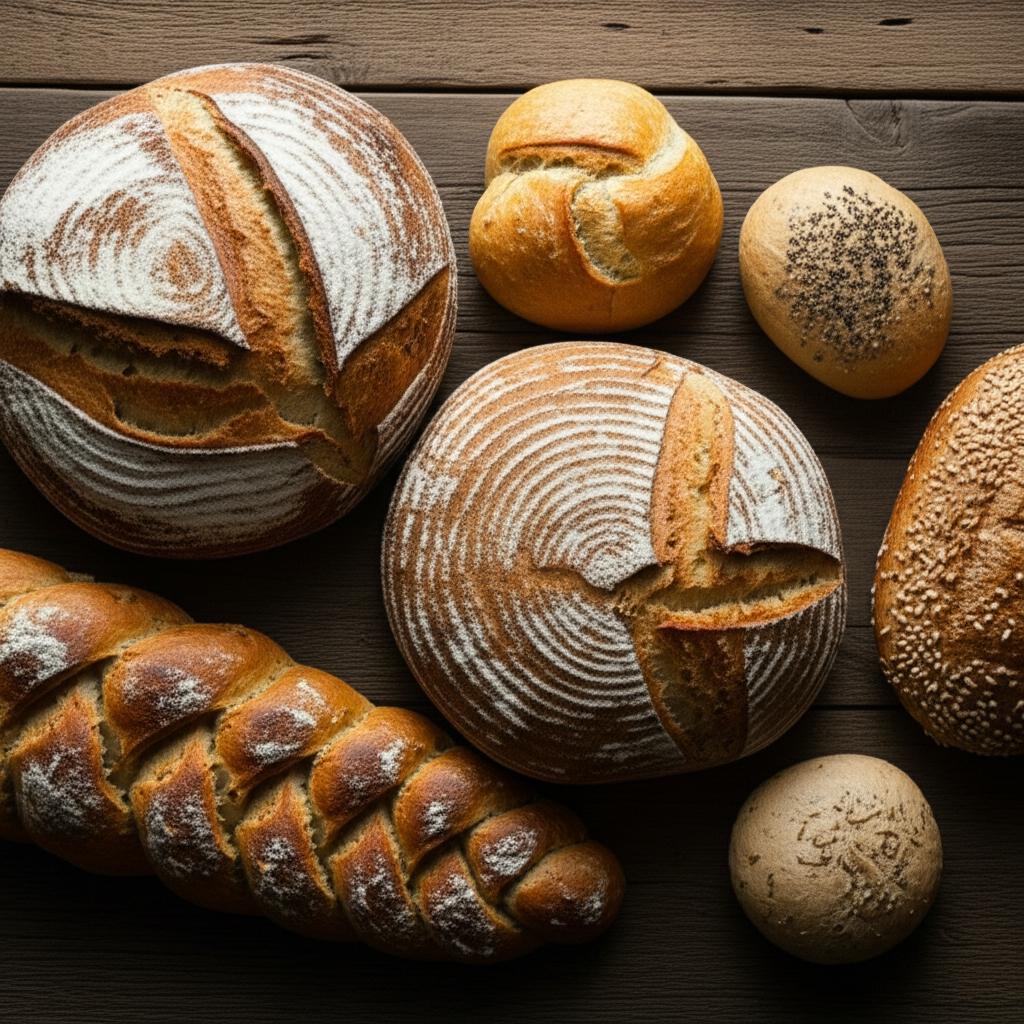
Shaping & Scoring: The Art of the Loaf
- Shaping: Crucial for building surface tension, which contributes to oven spring and a beautiful, even crumb. Practice makes perfect. Aim for a taut outer skin without tearing.
- Scoring (or Slashing): Using a lame (a specialized razor blade) or a very sharp knife, make deliberate cuts on the surface of your shaped dough just before baking.
- Why score? It controls where the bread expands in the hot oven, preventing uncontrolled tearing. It also adds a professional, artistic touch.
- Technique: Hold the blade at a shallow angle (around 20-30 degrees) for a dramatic “ear” (the flap that peels back). For a more open expansion, hold it straighter.
Baking with Steam & Dutch Ovens: The Artisan Crust
Achieving that crispy, crackly crust of artisan bread is all about steam in the initial stages of baking.
- Dutch Oven Method: This is the easiest and most effective way for home bakers. A preheated Dutch oven acts like a mini-oven, trapping the dough’s own moisture to create steam.
- Method: Place your Dutch oven (or heavy pot with a lid) in the oven as it preheats (usually to 450-500°F / 230-260°C). Carefully transfer your scored dough into the hot Dutch oven, cover, and bake for 20-30 minutes with the lid on. Remove the lid and continue baking for another 15-25 minutes until deeply golden brown.
- Open Baking with Steam: If you don’t have a Dutch oven, you can create steam by:
- Placing a pan of hot water or ice cubes on the bottom rack of your oven.
- Spraying the oven walls with water (be careful!).
- Bake on a preheated baking stone or steel for best results.
4. Beyond the Loaf: Creative Add-ins & New Forms
Once you’re comfortable with the techniques, let your imagination run wild!
-
Flavorful Add-ins:
- Herbs: Rosemary, thyme, oregano (e.g., in focaccia or a rustic loaf).
- Cheese: Cubed cheddar, grated parmesan, crumbled feta (e.g., in savory swirls or directly in the dough).
- Olives: Kalamata, green, black – adds a briny kick.
- Dried Fruits & Nuts: Raisins, cranberries, walnuts, pecans – perfect for sweeter or breakfast breads.
- Spices: Cumin, coriander, caraway (e.g., in rye bread).
- Vegetables: Roasted garlic, caramelized onions, sun-dried tomatoes.
-
Exploring Other Bread Types:
- Focaccia: A surprisingly simple flatbread, perfect for showcasing olive oil, herbs, and dimpling.
- Bagels: Chewy, dense, and requiring a crucial boiling step before baking.
- Challah: A beautiful, braided, enriched bread that’s soft and slightly sweet.
- Baguettes: The ultimate challenge in creating a crisp crust and open crumb.
- Ciabatta: A highly hydrated, rustic Italian slipper bread with an open, irregular crumb.
5. Troubleshooting & Avoiding Common Mistakes
Even experienced bakers face challenges. Understanding why things go wrong is the first step to fixing them.
-
Dense, Gummy Bread:
- Common Causes: Not enough kneading (under-developed gluten), too much flour (dough too dry), under-proofing (didn’t rise enough), or over-proofing (collapsed).
- Solution: Ensure proper kneading (windowpane test!), measure by weight for accuracy, allow sufficient rise time in a warm spot, and understand the signs of a well-proofed dough (jiggles, springs back slowly when poked).
-
Bland Crust, Pale Color:
- Common Causes: Not enough steam during initial bake, oven not hot enough, not baked long enough.
- Solution: Always preheat your oven adequately (at least 30-60 minutes). Use a Dutch oven or create ample steam during the first 15-20 minutes of baking. Bake until the crust is a deep, rich golden brown, not just light brown.
-
Lacking Oven Spring (Flat Loaf):
- Common Causes: Under-proofed, over-proofed, poor shaping (no surface tension), not enough steam, oven not hot enough.
- Solution: Get your proofing times right (the poke test is crucial: if it springs back quickly, it’s under-proofed; if it doesn’t spring back at all, it’s over-proofed). Practice shaping to create that tight skin. Ensure plenty of initial steam and a very hot oven.
-
Uneven Crumb (Large Holes, Dense Spots):
- Common Causes: Inconsistent mixing, insufficient stretching and folding, poor shaping, or being too aggressive with degassing the dough.
- Solution: Mix thoroughly until ingredients are fully incorporated. Perform regular stretch and folds to build an even gluten network. Be gentle when shaping; don’t punch all the air out.
-
Crust is Too Hard/Chewy:
- Common Causes: Over-baking, not enough steam, or letting the bread cool too slowly in a drafty area.
- Solution: Adjust baking time. Ensure proper steam during the initial bake. Let bread cool on a wire rack to allow air circulation. If the crust is still too hard, a light mist of water and a quick re-bake can sometimes help.
Conclusion: Embrace the Journey!
Stepping ‘Beyond the Basics’ in bread making is a rewarding journey of discovery. It’s about understanding the subtle nuances of dough, the magic of fermentation, and the art of transforming simple ingredients into something truly spectacular.
Don’t be afraid to experiment! Each loaf you bake is a learning experience. Pay attention to how the dough feels, how it reacts, and how the environment (temperature, humidity) affects it. With patience, practice, and these advanced insights, you’ll be baking artisan bread that rivals your favorite bakery in no time.
Happy baking! Your kitchen (and taste buds) will thank you.
- Saint Germain Bakery Premium Round Bread Banneton Basket with Liner – Perfect Brotform Proofing Basket for Making Beautiful Bread (9 inch)
- Banneton Bread Proofing Basket, Kook, Sourdough Proofing Bread Basket, Bread Banneton Proofing, Artisan Sourdough Making Baskets, 9 Inch Rattan Baskets and Cloth Liners, Set of 2, Round
- Dimpola Banneton Bread Proofing Basket Banneton Basket Set Sourdough Proofing Basket Round Proofing Bowls Handmade Rattan Baskets and Liners (Round 9 inch set of 2)
FAQ
Q. How do different types of flour (e.g., whole wheat, rye, spelt) affect my bread, and how should I adjust my recipe?
A. Different flours vary significantly in protein content and water absorption. Whole wheat and rye flours absorb more water than white all-purpose or bread flour due to their bran and germ content, but their gluten is weaker or less pliable. This means you’ll likely need to increase hydration (add more water) when substituting, but be mindful that higher percentages of these flours can result in a denser crumb. Spelt is often easier to digest and has a more extensible gluten structure, often requiring slightly less water than modern wheats. Always adjust water gradually based on how the dough feels.
Q. What is the purpose of cold proofing dough, and how long can I do it?
A. Cold proofing, also known as retarding, involves placing your shaped dough in the refrigerator for an extended period (typically 8-24 hours, sometimes up to 48 hours). This significantly slows down fermentation, allowing complex flavors to develop, improving the crust’s crispness, and making the dough easier to handle and score. It also offers scheduling flexibility. The maximum duration depends on your starter or yeast activity and the dough’s hydration, but generally, 24 hours is a safe bet for most recipes, with some sourdoughs tolerating longer.
Q. My sourdough starter seems active, but my bread lacks oven spring. What are common culprits?
A. Lacking oven spring, where the bread doesn’t expand much during baking, often points to a few issues. Your starter might be active but not strong enough to lift a large loaf; try feeding it more frequently or ensuring it’s at its peak before use. Overproofing or underproofing the dough are also common culprits – overproofing exhausts the yeast’s gas production, while underproofing means there isn’t enough gas built up. Improper shaping, which fails to create sufficient surface tension, can also lead to a lack of structure. Finally, insufficient heat or steam in your oven can hinder the initial burst of expansion.
Q. What are preferments like poolish, biga, or levain, and how do they enhance my bread?
A. Preferments are small batches of dough or batter (flour, water, and a tiny amount of yeast or sourdough starter) mixed hours before the main dough. Poolish is a liquid preferment (1:1 flour:water ratio), biga is stiffer (less water), and levain is a sourdough preferment. They enhance bread by developing deeper, more complex flavors (especially nutty, sweet, or tangy notes), improving the crumb’s texture and openness, and extending the dough’s shelf life. They also contribute to a more predictable fermentation process in the final dough.
Q. How can I achieve a more open, airy, and irregular crumb structure in my homemade bread?
A. Achieving an open crumb requires several techniques beyond basic kneading. Higher hydration doughs (more water relative to flour) are key, as they allow for larger gas pockets. Gentle handling and minimal degassing during shaping preserve these bubbles. Techniques like autolyse (allowing flour and water to rest before adding salt/yeast) help with gluten development without extensive kneading. Incorporating regular stretch and folds during bulk fermentation, rather than constant kneading, also develops strength while maintaining airiness. Proper bulk fermentation and proofing are crucial – stopping when the dough is sufficiently gassy but not overproofed.
Q. When and how should I incorporate additions like nuts, seeds, or dried fruit into my bread dough?
A. Incorporate additions after the initial bulk of gluten development, typically during the first or second set of stretch and folds (after about 30-60 minutes into bulk fermentation). This allows the gluten structure to form without being disrupted by the inclusions. For even distribution, spread the additions over the dough surface before folding, then gently knead or fold them in. If using dried fruits, consider soaking them briefly in water, tea, or alcohol beforehand to rehydrate them and prevent them from absorbing moisture from your dough, which can lead to a drier crumb.