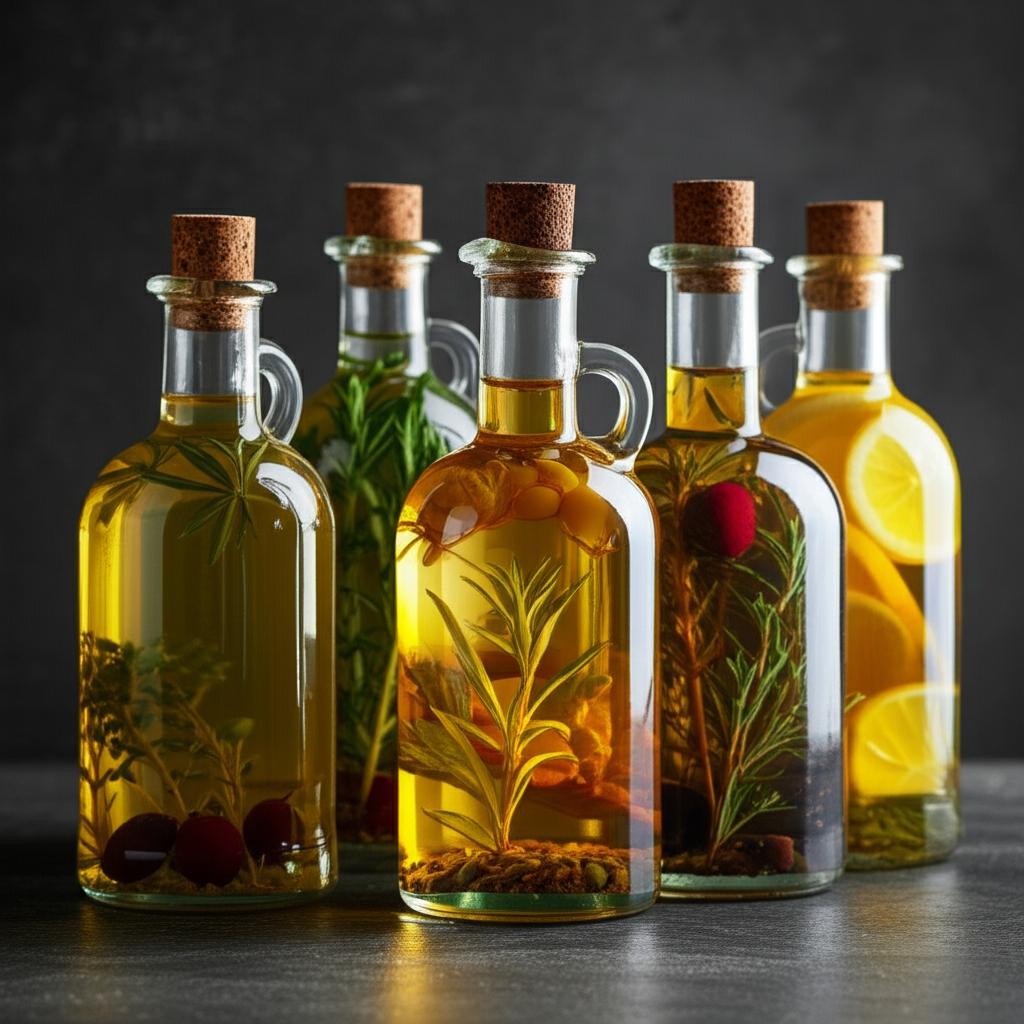
Elevate Your Culinary Creations: A Guide to Homemade Infused Oils & Vinegars
- Zulay Fruit Infuser Water Bottle – 34oz – Leakproof With Full-Length Infusion Rod – Men Women’s Ideal Fitness Gift Or For Gym, Camping – Black
- Glass Water Pitcher, Fruit Infuser Pitcher with Removable Lid, High Heat Resistance Infusion Carafe for Hot/Cold Water, Flavor-Infused Beverage & Iced Tea – 2 Qt
- Mfacoy Set of 6 Glass Bottles, 12 oz Clear Liquor Bottles, Heavy Base Glass Bottle with T-Top Cap, Vodka Bottle for Wine Beverages Drinks Oil Vinegar Kombucha Beer with Cork Stopper Airtight Lid
Imagine drizzling a rich, earthy rosemary-infused olive oil over roasted vegetables, or splashing a vibrant lemon-dill white wine vinegar over a fresh summer salad. Homemade infused oils and vinegars are culinary game-changers, transforming everyday dishes into gourmet experiences. They’re surprisingly easy to make, incredibly versatile, and make for thoughtful, personalized gifts.
This comprehensive guide will walk you through everything you need to know, from choosing your ingredients to essential safety tips, ensuring your infusions are both delicious and safe.
Why Make Your Own Infused Oils & Vinegars?
Beyond the sheer delight of enhanced flavors, there are several compelling reasons to dive into the world of homemade infusions:
- Unleash Custom Flavors: The possibilities are endless! Create unique combinations not available in stores.
- No Artificial Additives: You control every ingredient, ensuring pure, natural flavors without preservatives or artificial enhancements.
- Economical: Making your own can be more cost-effective than buying specialty infused products.
- Impressive Gifts: A beautiful bottle of homemade infused oil or vinegar is a charming and personal present for any food lover.
- Boost Culinary Creativity: Having a range of infused options in your pantry inspires new recipes and flavor pairings.
Choosing Your Base: Oils & Vinegars
The quality of your base ingredient directly impacts the final flavor of your infusion.
For Infused Oils:
- Extra Virgin Olive Oil (EVOO): A popular choice due to its robust flavor profile that pairs well with herbs, garlic, and chilies. Its stronger taste means subtle infusions might get lost, so choose stronger flavorings.
- Light Olive Oil: Has a milder flavor than EVOO, allowing the infused ingredients to shine through more distinctly.
- Avocado Oil: Very mild in flavor, high smoke point, and rich in monounsaturated fats. Excellent for delicate infusions.
- Grapeseed Oil: Neutral flavor, light texture, and a good source of vitamin E. Ideal for showcasing subtle flavors.
- Sunflower Oil: Light, neutral, and a good all-purpose oil for many infusions.
Tip: Choose a high-quality, fresh oil from a reputable source. Avoid anything close to its expiration date, as rancid oil will ruin your infusion.
For Infused Vinegars:
Vinegars offer a fantastic canvas for both sweet and savory infusions due to their inherent acidity.
- White Wine Vinegar: A versatile and popular choice, providing a crisp, clean base that complements most herbs, fruits, and spices.
- Red Wine Vinegar: Deeper, fruitier, and more robust. Pairs well with bolder herbs like rosemary, thyme, or garlic.
- Apple Cider Vinegar (ACV): Tangy and slightly sweet, fantastic with fruits (berries, apples), ginger, or tarragon.
- Balsamic Vinegar: Rich, complex, and naturally sweet. Best for fruit infusions (figs, berries) or very bold herbs.
- Rice Wine Vinegar: Mild and slightly sweet, ideal for Asian-inspired infusions like ginger, chili, or lemongrass.
Tip: Use unfiltered vinegars for better flavor and potential health benefits, though filtered works perfectly fine too.
What to Infuse With: Flavoring Ingredients
The true fun begins when selecting your infusing ingredients! Aim for fresh, high-quality ingredients for the best results.
Herbs:
- Rosemary: Woody, piney – excellent with olive oil or red wine vinegar.
- Thyme: Earthy, slightly floral – pairs well with most oils and vinegars.
- Oregano: Pungent, robust – great in olive oil for Mediterranean dishes.
- Basil: Sweet, peppery – lovely in olive oil or white wine vinegar.
- Dill: Fresh, grassy – fantastic with white wine or apple cider vinegar, especially for seafood.
- Mint: Refreshing – perfect for fruit-based vinegars.
- Tarragon: Anise-like, sophisticated – beautiful in white wine vinegar.
Crucial Safety Note for Oils: Always use thoroughly dried herbs (store-bought or air-dried) when infusing oils, or blanch fresh herbs in boiling water for 10-15 seconds, then dry completely before adding to oil. Fresh, wet, low-acid ingredients in oil create a low-oxygen environment where Clostridium botulinum can thrive. This is a severe food safety risk.
Spices & Aromatics:
- Garlic: Pungent, savory – EXTREME CAUTION REQUIRED FOR OILS (see safety section below). Best to use dried garlic or roast fresh garlic cloves until tender and completely dry before adding to oil.
- Chili Peppers: Dried whole or flakes – for spicy infusions.
- Peppercorns: Black, white, green, or pink – add a subtle warmth.
- Bay Leaves: Aromatic, slightly floral.
- Ginger: Freshly sliced or peeled – wonderful in rice wine vinegar or a mild oil.
Citrus:
- Lemon/Orange/Lime Zest: Use a vegetable peeler or microplane to get just the zest (the colorful outer layer), avoiding the bitter white pith. Fresh zest provides bright, aromatic notes.
- Dried Citrus Peel: Less intense, but still fragrant.
Other Ideas:
- Dried Mushrooms: Porcini, shiitake – for earthy, umami-rich oils.
- Sun-dried Tomatoes: Pack a punch of savory flavor (ensure they are thoroughly dried, not oil-packed).
- Shallots/Onions: Again, extreme caution with fresh in oil. Best dried or roasted until crispy and dry.
- Fresh Fruit (for Vinegars): Raspberries, blueberries, strawberries, cherries, peaches, plums. Often lightly crushed.
- Dried Fruit (for Vinegars): Figs, apricots, cranberries.
The Infusion Process: Step-by-Step
Before you begin, ensure all your equipment is spotlessly clean and sterilized. Wash glass bottles/jars and lids thoroughly with hot, soapy water, rinse well, and dry in a low oven (250°F/120°C) for 10-15 minutes or run through a hot dishwasher cycle.
Method 1: Cold Infusion (Best for both Oils & Vinegars)
This is the safest and simplest method, especially for oils, as it avoids heating the oil to high temperatures, which can degrade delicate flavors.
-
Prepare Your Ingredients:
- Herbs: For oils, use thoroughly dried herbs. For vinegars, fresh herbs are fine, but ensure they are clean and dry. Gently crush herbs to release more flavor.
- Garlic/Aromatics (Oils ONLY): Critically important: If using fresh garlic or other fresh, low-acid ingredients in oil, they MUST be roasted until tender and dry, or submerged in acid (like vinegar) before adding to oil, AND the oil MUST be refrigerated and used within 7-10 days. For long-term shelf stability without refrigeration, use dried garlic granules or powders only.
- Chilies/Spices: Break or slightly crush them.
- Citrus Zest: Peel large strips of zest, avoiding the white pith.
- Fruit (for Vinegars): Gently crush berries or slice larger fruits.
-
Combine & Fill: Place your prepared flavoring ingredients into your clean, sterilized glass bottle or jar. Pour your chosen oil or vinegar over them, ensuring the ingredients are completely submerged. This is vital to prevent spoilage and mold growth, especially in vinegar.
-
Seal & Store: Seal the bottle tightly.
-
Infuse:
- Oils: Store in a cool, dark place (like a pantry). Flavors develop over 1 to 2 weeks. For maximum safety, refrigerate any oil infused with fresh ingredients (even roasted ones) and use within 7-10 days.
- Vinegars: Store in a cool, dark place. Flavors usually develop faster than oils, often within 3-7 days, but can go longer for deeper flavor.
-
Taste & Strain: After the recommended infusion time, taste a small amount. If the flavor is to your liking, strain the oil or vinegar through a fine-mesh sieve or cheesecloth to remove all solid ingredients. This dramatically extends shelf life and prevents further flavor development or spoilage from decaying solids. If you want a visual appeal, you can add a fresh sprig of dried herb or a dried chili pepper after straining.
-
Re-bottle & Label: Pour the strained infusion back into a clean, sterilized bottle. Label clearly with the ingredients and the date it was made.
Method 2: Heat Infusion (Oils ONLY – Gentle Heat)
This method extracts flavor more quickly but requires careful temperature control.
- Prepare Ingredients: Same as cold infusion, with the same critical safety warnings for fresh, low-acid ingredients like garlic or herbs.
- Gentle Heat: In a clean saucepan, gently heat your oil over very low heat (don’t let it smoke or simmer). The goal is to warm it to around 150-180°F (65-82°C) – just warm to the touch, not hot.
- Add Flavorings: Add your prepared flavoring ingredients to the warm oil.
- Steep: Let the ingredients steep in the warm oil for 30 minutes to 2 hours, continuing to keep it on very low heat, or remove from heat and let cool slowly. The longer it steeps, the stronger the flavor.
- Cool & Strain: Allow the oil to cool completely to room temperature. Once cool, strain out all solid ingredients.
- Re-bottle & Label: Store as per cold infusion instructions.
Method 3: Heat Infusion (Vinegars ONLY – Simmer)
This method rapidly infuses vinegars.
- Prepare Ingredients: Same as cold infusion for vinegars.
- Combine & Simmer: In a non-reactive saucepan (stainless steel or enameled cast iron), combine your vinegar and prepared flavoring ingredients. Bring to a gentle simmer (do not boil vigorously).
- Steep: Simmer gently for 5-10 minutes. The longer you simmer, the more flavor will be extracted, but the vinegar’s acidity may also slightly decrease.
- Cool & Strain: Remove from heat and allow the vinegar to cool completely to room temperature. Once cool, strain out all solid ingredients.
- Re-bottle & Label: Store as per cold infusion instructions.
Crucial Safety & Storage Information
This is the most critical section of this guide. Ignoring these warnings can lead to serious health risks.
-
The Botulism Threat (for Oils):
- Clostridium botulinum is a bacterium that produces a deadly toxin. It thrives in low-acid, low-oxygen environments (like oil) and where moisture is present.
- Fresh garlic, fresh herbs, and other fresh low-acid vegetables (like sun-dried tomatoes not packed in oil) are high-risk ingredients when infused in oil at room temperature. They can harbor botulism spores.
- Rule #1: NEVER store fresh garlic or fresh herbs infused in oil at room temperature.
- Safest Option for Oils: Use thoroughly dried herbs (like store-bought dried rosemary, oregano, etc.), dried chilies, dried citrus peel, or dried spices for shelf-stable oil infusions.
- If you MUST use fresh low-acid ingredients in oil (e.g., roasted garlic, blanched fresh herbs):
- Always refrigerate immediately.
- Use within 7-10 days maximum.
- Discard after this period, or if you see any signs of spoilage (cloudiness, bubbling, off-smell). When in doubt, throw it out!
-
Sterilization: Always sterilize your bottles and jars (wash, then dry in a low oven or run through the sanitize cycle of a dishwasher) to eliminate harmful bacteria.
- Dry Ingredients: Ensure all fresh ingredients are completely dry before adding them to oil or vinegar. Any residual water can introduce bacteria and lead to spoilage.
- Complete Submersion: Make sure all solid ingredients are fully submerged in the oil or vinegar. Anything exposed to air can mold or spoil.
- Storage Conditions:
- Infused Oils (with dried ingredients): Store in a cool, dark place (pantry, cupboard) away from direct sunlight and heat.
- Infused Oils (with fresh/roasted ingredients): MUST be refrigerated.
- Infused Vinegars: Store in a cool, dark place. Refrigeration is generally not necessary due to the high acidity, but it can help maintain vibrant colors and slow down flavor degradation for fruit infusions.
- Shelf Life:
- Infused Oils (with dried ingredients): Generally last for 3-6 months, or as long as the base oil’s “best by” date, whichever comes first.
- Infused Oils (with fresh/roasted ingredients): 7-10 days refrigerated.
- Infused Vinegars: Can last for 6 months to 1 year or even longer, depending on ingredients and storage. Fruit vinegars may have a slightly shorter shelf life.
- Signs of Spoilage: Discard immediately if you notice any of these:
- Mold growth (any color)
- Cloudiness or sediment (that wasn’t there before)
- Foul or “off” odor
- Bubbling or foaming
Common Mistakes to Avoid
- Not Sterilizing Jars/Bottles: A breeding ground for unwanted bacteria.
- Using Wet Ingredients: Water introduces bacteria and can lead to mold and spoilage, especially in oil.
- Ignoring Botulism Risk: This is the most dangerous mistake. Fresh garlic/herbs in room-temperature oil is a serious no-go for long-term storage.
- Over-Infusing: Leaving ingredients in the oil/vinegar for too long can lead to bitter, muddy, or overwhelming flavors. Taste as you go!
- Improper Storage: Heat, light, and air are enemies of infused products.
- Forgetting to Label: You’ll thank yourself later when you know exactly what’s in the bottle and when it was made.
Tips for Success
- Start Simple: Begin with classic combinations like rosemary-garlic (dried garlic!) olive oil or lemon white wine vinegar.
- Taste as You Go: Don’t be afraid to sample small amounts during the infusion process to determine when the flavor is just right.
- Label Clearly: Include ingredients and the date of creation. This is crucial for tracking freshness and safety.
- Experiment with Combinations: Once you’re comfortable, unleash your creativity! Try combinations like ginger-chili oil, or blackberry-mint vinegar.
- Strain Thoroughly: Removing all solids after infusion is key to safety and extending shelf life.
- Consider Presentation: Use attractive glass bottles to make your homemade infusions even more special, especially if gifting.
Conclusion
Crafting your own infused oils and vinegars is a rewarding culinary adventure. With minimal effort, you can transform simple ingredients into flavor powerhouses that elevate your cooking and impress your guests. Remember to prioritize safety above all else, especially when working with oils and fresh ingredients. Follow these guidelines, experiment with confidence, and get ready to savor the incredible flavors of your homemade infusions!
- Zulay Fruit Infuser Water Bottle – 34oz – Leakproof With Full-Length Infusion Rod – Men Women’s Ideal Fitness Gift Or For Gym, Camping – Black
- Glass Water Pitcher, Fruit Infuser Pitcher with Removable Lid, High Heat Resistance Infusion Carafe for Hot/Cold Water, Flavor-Infused Beverage & Iced Tea – 2 Qt
- Mfacoy Set of 6 Glass Bottles, 12 oz Clear Liquor Bottles, Heavy Base Glass Bottle with T-Top Cap, Vodka Bottle for Wine Beverages Drinks Oil Vinegar Kombucha Beer with Cork Stopper Airtight Lid
FAQ
Q
Q. What are the primary safety concerns when making homemade infused oils, especially with fresh ingredients?
A. The main concern is the risk of botulism, a serious foodborne illness. Clostridium botulinum bacteria thrive in anaerobic (oxygen-free), low-acid environments, which fresh ingredients (like garlic, herbs, or sun-dried tomatoes) submerged in oil create. It’s crucial to properly acidify fresh ingredients (e.g., with vinegar or citric acid) before infusing, use only dried ingredients, or ensure oils are stored under refrigeration and used within a short timeframe (1-2 weeks). Always strain out all solids before storing.
Q
Q. How long do homemade infused oils and vinegars typically last, and what are the best storage methods?
A. Homemade infused oils, especially those made with fresh ingredients (even if acidified), have a much shorter shelf life than commercial oils. They should be refrigerated and used within 1 to 2 weeks. Oils made with only dried ingredients, if completely free of moisture and strained, can last longer (up to 1 month refrigerated) but still benefit from refrigeration. Infused vinegars, due to their high acidity, have a much longer shelf life, often lasting several months to a year or more when stored in a cool, dark place away from direct sunlight.
Q
Q. What types of ingredients are best suited for infusing oils and vinegars safely?
A. For oils, dried herbs (rosemary, oregano, thyme), dried chili peppers, citrus zest (without the bitter white pith), whole peppercorns, and spices (cinnamon sticks, star anise) are ideal as they carry less moisture and reduce botulism risk. For vinegars, a wider range of ingredients can be used, including fresh herbs (basil, dill, mint), berries, citrus peels, garlic (though some prefer to blanch or roast garlic first for safety and flavor), and even vegetables like cucumbers or bell peppers.
Q
Q. Is it necessary to strain out the solid ingredients after infusing oils and vinegars?
A. For infused oils, it is highly recommended and often crucial for safety to strain out all solid ingredients after the infusion period. Leaving fresh ingredients in the oil creates an anaerobic environment that can promote the growth of Clostridium botulinum. For infused vinegars, while not as critical for safety due to the high acidity, straining out solids after a few days to a few weeks can prevent the flavor from becoming too strong, improve clarity, and extend shelf life by preventing mold growth on ingredients exposed to air.
Q
Q. Can I use both a hot infusion method and a cold infusion method for oils and vinegars? What are the differences?
A. Yes, both methods can be used. Cold infusion (maceration) involves simply combining ingredients and letting them steep at room temperature over several days or weeks. It’s generally considered safer for oils as it avoids heating ingredients, but it’s slower. Hot infusion involves gently heating the oil or vinegar with the ingredients. For oils, this can accelerate the flavor extraction but must be done carefully to avoid burning ingredients or creating conditions for bacterial growth. For vinegars, a gentle simmer can quickly infuse flavors. Always cool completely before bottling.
Q
Q. Why might my homemade infused oil turn cloudy or develop an unusual smell, and what should I do?
A. If your infused oil turns cloudy, it could simply be due to refrigeration, as olive oil (a common base) can solidify and become cloudy at cold temperatures; it will clear when warmed to room temperature. However, if it’s cloudy at room temperature or develops an off-smell (rancid, sour, or putrid), it’s a strong indicator of spoilage, potentially due to bacterial growth or the oil going rancid. Do not taste it. For safety, it’s best to discard any infused oil that shows signs of spoilage, unusual smell, or mold growth.
