When it comes to modern kitchen essentials, few items blend convenience and functionality as perfectly as microwave-safe containers with locking lids. Whether you’re a seasoned meal prepper, a busy parent juggling schedules, or just someone who enjoys the luxury of perfectly reheated leftovers, these versatile containers are an absolute game-changer. They don’t just store your food; they protect it, make transport a breeze, and ensure your meals are ready for a quick zap without any fuss or mess.
In this comprehensive guide, we’re going to dive deep into the world of these indispensable kitchen allies. We’ll explore why they’ve become a must-have, what makes them truly “microwave-safe,” the unsung heroics of their locking lids, how to pick the best ones for your lifestyle, and essential tips for getting the most out out of them. Get ready to transform your food storage and reheating routine!
Why Microwave-Safe Containers with Locking Lids Are a Kitchen Essential
In today’s fast-paced world, efficiency in the kitchen isn’t just a luxury; it’s a necessity. That’s where quality food storage containers come in, and those specifically designed for microwave use with secure locking lids offer a multitude of benefits that extend far beyond simple storage.
Firstly, they dramatically simplify meal prep. Imagine batch-cooking your favorite healthy meals for the week, portioning them out, and then simply grabbing a container from the fridge or freezer when hunger strikes. No more scrambling for lunch ideas or resorting to unhealthy takeout options. These containers streamline the process, helping you stick to dietary goals and save precious time.
Secondly, they’re champions of food preservation. The airtight seal provided by locking lids keeps air out, significantly slowing down spoilage and keeping your food fresher for longer. This means less food waste, which is not only good for your wallet but also for the environment. Beyond freshness, this tight seal also prevents dreaded freezer burn, preserving the taste and texture of your frozen meals.
Thirdly, convenience is king. Picture this: you’ve packed your lunch for work, and it’s securely nestled in your bag. Thanks to the locking lid, there’s zero chance of leaks or spills, protecting your bag, your clothes, and your peace of mind. When lunchtime arrives, you can pop the entire container (or at least the base) directly into the microwave. No need to transfer food to another dish, which means fewer dishes to wash later – a definite win in anyone’s book!
Finally, from an organizational standpoint, a good set of these containers can transform a chaotic pantry or fridge into a picture of order. Many designs are stackable, making the most of limited space and ensuring everything has its place. This isn’t just about aesthetics; it makes it easier to find what you need and keep track of your food inventory.
In essence, investing in high-quality microwave-safe containers with locking lids is an investment in your time, your health, your budget, and the overall efficiency of your kitchen.
Understanding What Makes a Container “Microwave-Safe”
The term “microwave-safe” isn’t just a marketing buzzword; it’s a critical safety indicator. Heating food in the microwave involves exposing it to electromagnetic waves, which cause water molecules within the food to vibrate rapidly, generating heat. The container needs to be able to withstand this heat without melting, leaching harmful chemicals into your food, or reacting negatively in any way.
Key Materials to Look For
Not all materials are created equal when it comes to microwave compatibility. Here are the most common and safest options:
Glass
Glass containers are often considered the gold standard for microwave use, and for good reason.
* Pros:
* Excellent Heat Resistance: High-quality borosilicate or tempered glass can withstand extreme temperature changes, making them safe for oven, microwave, freezer, and dishwasher use.
* Non-Porous: Glass doesn’t absorb food odors, stains, or flavors, ensuring your food tastes fresh every time.
* Non-Reactive: It won’t leach chemicals into your food, even at high temperatures, offering superior food safety.
* Durability: While it can break if dropped, glass is very durable under normal use conditions and won’t warp over time.
* Transparency: You can easily see what’s inside, which is great for organization.
* Cons:
* Weight: Glass containers are heavier than plastic, which can be a consideration for portability.
* Breakability: They can shatter if dropped or subjected to extreme thermal shock (e.g., placing a very hot dish on a cold, wet surface).
Specific Plastics (PP, HDPE)
Not all plastics are microwave-safe, and it’s crucial to know which ones are. Look for the recycling symbols, usually a triangle with a number inside.
* Polypropylene (PP – #5): This is the most common and generally safest plastic for microwave use. It has a high melting point and is relatively stable. Most commercially available plastic food storage containers marked “microwave-safe” are made from PP.
* High-Density Polyethylene (HDPE – #2): While sometimes used for food storage, HDPE is generally less common for microwaveable containers than PP due to its lower melting point. Always check for a specific “microwave-safe” label.
* Pros of Safe Plastics:
* Lightweight: Ideal for portability, making them popular for packed lunches.
* Durable: Less prone to breaking than glass.
* Affordable: Generally less expensive than glass or silicone.
* Cons of Safe Plastics:
* Staining/Odor Absorption: Can sometimes absorb food odors and colors, especially with tomato-based sauces.
* Wear and Tear: Over time, they can scratch, warp, or degrade, especially if not cared for properly.
* Potential for Leaching (if not BPA-free): Even “safe” plastics can become questionable if not BPA-free (more on this below).
Silicone
Silicone is a relatively newer material gaining popularity in kitchenware.
* Pros:
* Extremely Flexible: Can be collapsed for compact storage, which is a huge space-saver.
* Wide Temperature Range: Safe for microwave, oven, freezer, and dishwasher.
* Non-Stick and Non-Porous: Easy to clean and doesn’t retain odors or stains.
* Durable: Very resistant to tearing and degradation.
* Lightweight: Lighter than glass, comparable to plastic.
* Cons:
* Cost: Can be more expensive than plastic.
* Heat Transfer: Can get quite hot to the touch in the microwave, requiring oven mitts.
* Support: Some soft silicone containers might need a plate underneath if they’re very full.
What to Avoid
Just as important as knowing what to use is knowing what not to use. Avoid putting the following materials in the microwave:
* Styrofoam (Polystyrene – #6): Melts easily, potentially leaching harmful chemicals into food.
* Melamine: While durable for serving, melamine can break down and release chemicals when heated to high temperatures in a microwave.
* Single-Use Plastic Containers: (e.g., yogurt tubs, butter containers, takeout containers with no microwave-safe label). These are usually made from thin plastics like PS (#6) or PVC (#3) which can warp, melt, and leach chemicals when heated.
* Metal: Any form of metal (including foil or containers with metal trim) should never go in the microwave as it can cause arcing and sparks, damaging your microwave and posing a fire hazard.
* Some Lids: Always check if the lid is microwave-safe. Many plastic lids are not designed for direct heating and can warp or melt.
The Importance of “BPA-Free”
Bisphenol A (BPA) is an industrial chemical used to make certain plastics and resins. While its safety is still debated, many consumers prefer to avoid it. BPA can potentially leach into food, especially when plastic is heated. Look for containers explicitly labeled “BPA-free” for peace of mind. This label ensures that the container is made without BPA, regardless of the type of plastic (PP, HDPE, etc.). It’s a key indicator of safer plastic for food storage and heating.
The Magic of Locking Lids: More Than Just a Seal
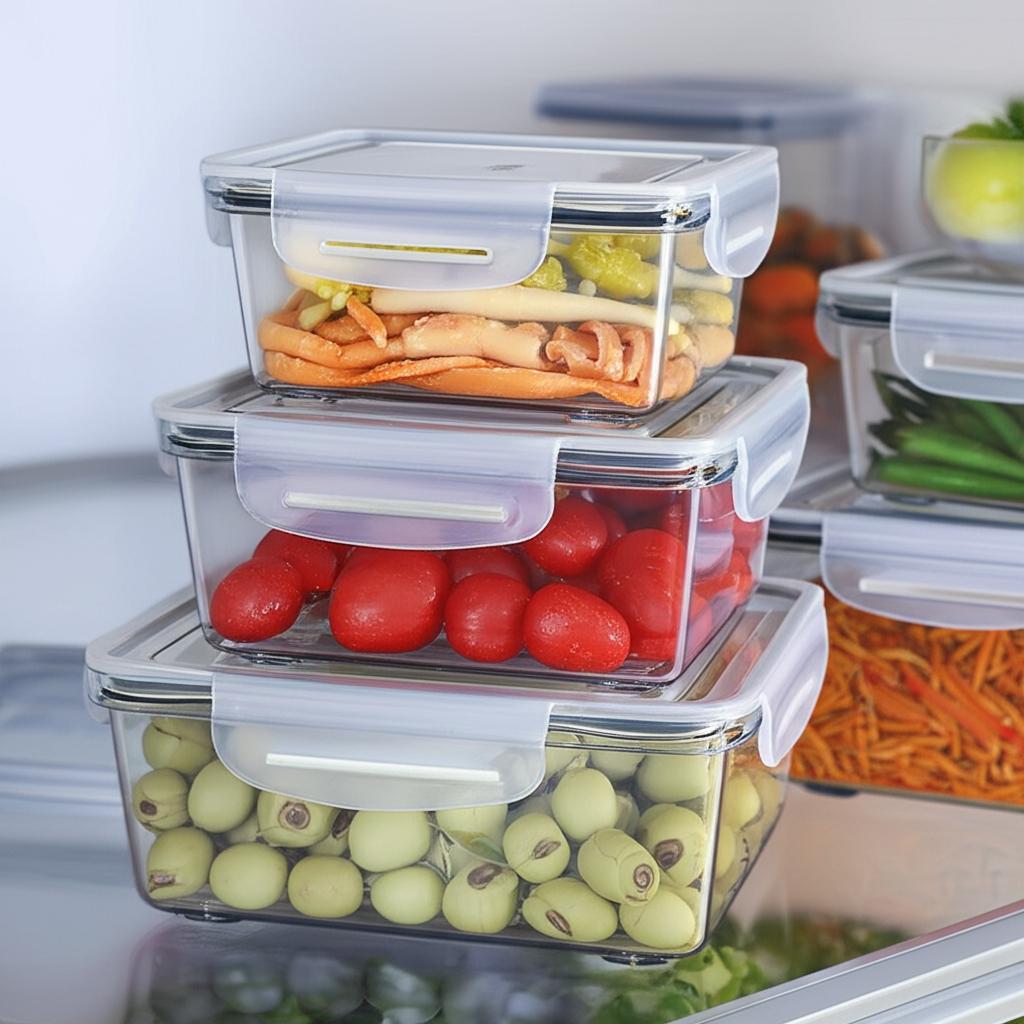
The “locking lid” aspect of these containers is just as crucial as their microwave-safe status. These aren’t your grandmother’s flimsy Tupperware lids that pop off at the slightest jostle. Modern locking lids feature robust clasps (often 2, 3, or 4 on the sides) that create a truly secure seal. But what does that really mean for your daily life?
Leak-Proof & Spill-Proof
This is arguably the most celebrated feature. The combination of the locking mechanism and often a silicone or rubber gasket within the lid creates an incredibly tight seal. This means you can confidently pack soups, stews, sauces, or anything with a liquid component without fear of messy leaks in your bag, car, or fridge. Say goodbye to ruined textbooks or soggy gym clothes! This leak-proof quality also means you can easily store food on its side if space is tight, without worrying about spills.
Air-Tightness for Freshness
Beyond preventing liquid escape, the secure seal also acts as a barrier against air. Oxygen is one of the primary culprits in food spoilage, causing oxidation, staleness, and bacterial growth. An airtight seal significantly reduces oxygen exposure, keeping your fruits and vegetables crisp, your cooked meals fresh, and your baked goods soft for much longer. This translates directly into less food waste and more enjoyment from your culinary efforts.
Convenience in Transport
Whether you’re commuting to work, heading to a potluck, or packing a picnic, the robust nature of locking lids makes transportation incredibly convenient. You don’t have to worry about cling film or extra bags to prevent mishaps. The container itself is a self-contained unit, ready for travel. Many designs are also stackable, making it easy to carry multiple meals or components for a larger dish.
Preventing Freezer Burn
Freezer burn occurs when food is exposed to air in the freezer, leading to dehydration and oxidation, which affects taste, texture, and color. The airtight seal of quality locking lids is highly effective at preventing this. By minimizing air contact, they help maintain the quality of your frozen foods, ensuring that your batch-cooked meals taste just as good when reheated months later as they did on day one.
Choosing the Right Containers for Your Needs
With so many options on the market, selecting the perfect set of microwave-safe containers with locking lids can feel a bit overwhelming. Here are some key factors to consider to ensure you make the best choice for your lifestyle:
Size and Shape Considerations
Think about what you’ll primarily be storing.
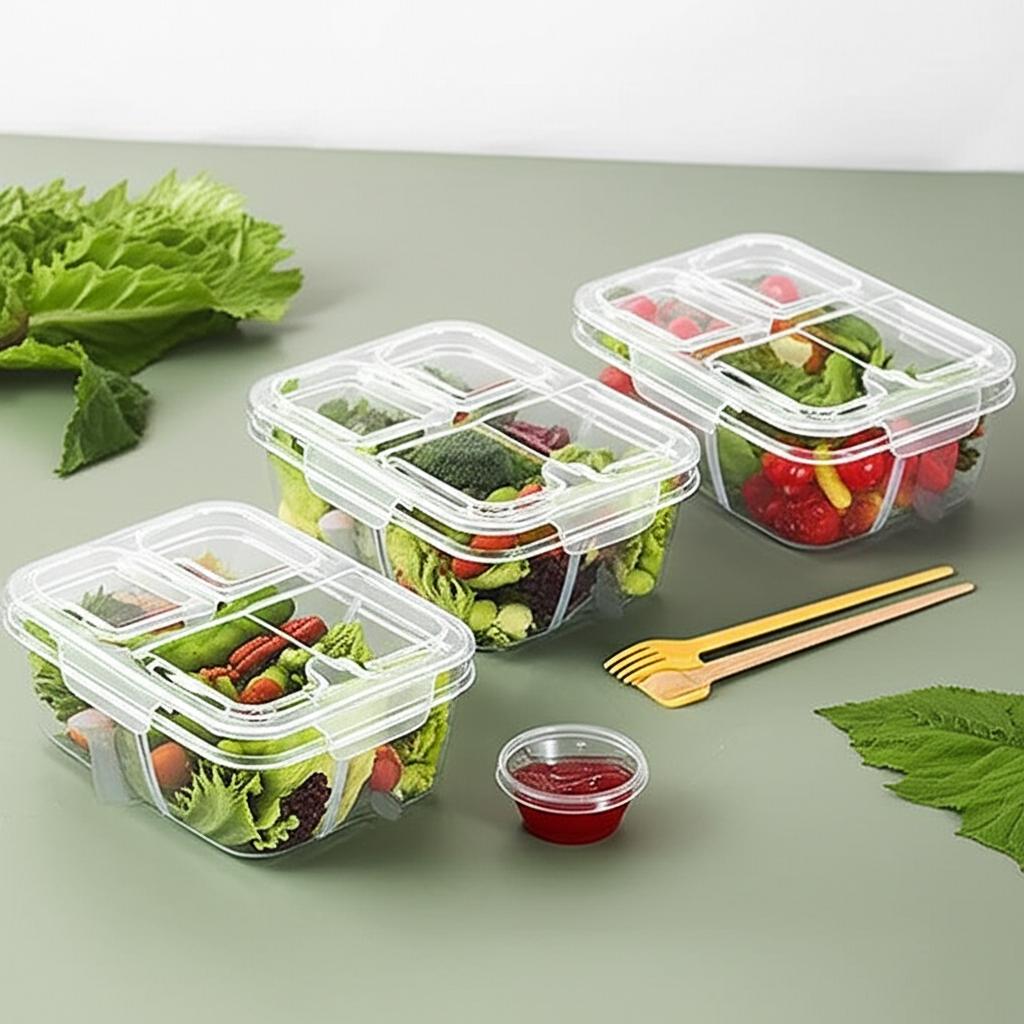
* Individual Portions: For meal prep, consider containers with capacities ranging from 2-4 cups (500ml-1L).
* Family Meals/Batch Cooking: Larger rectangular or square containers (6-10+ cups) are great for storing bigger portions of lasagna, casseroles, or roasted vegetables.
* Small Snacks/Sides: Tiny containers (0.5-1 cup) are perfect for dressings, nuts, fruit, or dips.
* Variety Packs: Many brands offer sets with a mix of sizes and shapes, which can be a great starting point.
* Shape: Rectangular and square containers are generally more space-efficient in fridges and freezers than round ones.
Vented Lids: A Game-Changer for Reheating
Some locking lids come with a small vent or a removable plug. This seemingly minor feature is incredibly useful for microwaving. When heating food, steam builds up inside the container. If the lid is sealed, this pressure can cause the lid to pop off, create a mess, or even make the container dangerously hot. A vent allows steam to escape while the lid remains securely latched, preventing splatters and ensuring even heating. If your lids don’t have vents, remember to slightly unlatch one of the locking tabs or remove the lid completely before microwaving.
Stackability and Storage
Consider how much storage space you have in your kitchen cupboards. Many modern containers are designed to nest within each other when empty, saving valuable space. Others are designed to stack neatly on top of each other, whether full or empty, maximizing fridge or freezer space. Look for designs that offer both practicality and efficient storage solutions.
Sets vs. Individual Containers
- Sets: Often more cost-effective per container and provide a cohesive look. They typically come with a range of sizes, which is great for general household use.
- Individual Containers: Ideal if you have very specific needs (e.g., only need large family-sized containers) or if you want to replace a single lost or damaged container from an existing set.
Durability and Quality of Seals
Examine the quality of the plastic or glass, and especially the locking tabs and the silicone/rubber gasket.
* Locking Tabs: Should feel sturdy and snap securely into place without excessive force. Flimsy tabs can break over time.
* Gasket: The silicone or rubber seal should fit snugly into a groove in the lid. It should be easy to remove for thorough cleaning but also reinsert securely. A good gasket is crucial for both leak-proofing and airtightness.
Tips for Using and Maintaining Your Containers
To ensure your microwave-safe containers with locking lids last for years and perform optimally, a little care goes a long way.
Proper Reheating Techniques
- Vent, Vent, Vent! If your lid has a vent, open it before microwaving. If not, unlatch at least one of the locking tabs or remove the lid completely to allow steam to escape. This prevents pressure buildup and messy explosions.
- Microwave on Medium Power: Especially for denser foods, using a slightly lower power setting and heating in shorter intervals (e.g., 60-90 seconds) with stirring in between can lead to more even heating and prevent food from overheating or drying out.
- Stir Halfway: For best results, stop the microwave halfway through the heating time, stir the food, and continue heating. This ensures heat is distributed evenly.
- Avoid Overheating Oils/Fats: While the containers are microwave-safe, extremely hot oils or fats can sometimes exceed the container’s heat resistance, especially with plastic. Be mindful of very oily or greasy foods.
Cleaning and Care
- Dishwasher Safe: Most quality microwave-safe containers with locking lids are dishwasher safe. For plastic lids and bases, placing them on the top rack is generally recommended to prevent warping from intense heat.
- Hand Washing: For stubborn food residues, hand washing with warm, soapy water is effective. For plastic containers, hand washing can also help prolong their life.
- Dealing with Stains:
- Sunlight: For plastic containers, direct sunlight can work wonders on tomato-based stains. Wash the container, then let it sit in direct sunlight for a few hours.
- Baking Soda Paste: Make a paste of baking soda and water, spread it over the stain, let it sit for a few hours or overnight, then scrub and rinse.
- Lemon Juice: For a natural bleach, rub a cut lemon over the stain and let it sit.
- Drying Lids Thoroughly: Ensure lids, especially the silicone gaskets, are completely dry before storing to prevent mildew or odors.
Storing When Not in Use
- Nested Storage: Many containers are designed to nest, saving cupboard space.
- Lids Separately: Some prefer to store lids separately from the bases to prevent odors from getting trapped. Others clip the lids onto the containers, ready to go. Find what works for your space and preference.
- Avoid Extreme Temperatures: Don’t store containers near direct heat sources (like ovens or stovetops) as this could potentially warp or damage them over time, especially plastic ones.
Common Mistakes to Avoid
Even with the best containers, sometimes simple oversights can lead to frustration or damage. Steering clear of these common mistakes will ensure your containers remain in top condition and your food is perfectly heated.
Overfilling
Filling containers to the absolute brim can cause several issues. First, it makes it harder to secure the locking lid without spillage. Second, when food heats in the microwave, it can expand, leading to messy overflows. Always leave a little headspace, especially for liquids or foods that bubble.
Not Venting (if applicable)
As mentioned, if your lid has a vent, use it! For lids without vents, remember to always unlatch at least one of the locking tabs or remove the lid completely before microwaving. Failing to do so can cause pressure to build up, leading to lids popping off, food splattering, or even container damage. This is a crucial safety and cleanliness tip.
Ignoring Damage
If a container (especially plastic) is cracked, warped, deeply scratched, or stained beyond repair, it’s time to replace it. Damaged containers can harbor bacteria, lose their airtight seal, or potentially leach chemicals if the structural integrity is compromised. For glass containers, even small chips can weaken the structure and lead to shattering.
Using Non-Microwave Safe Lids
Not all lids are created equal. While the container base might be microwave-safe, the lid often isn’t. Many plastic lids can warp, melt, or even leach chemicals when exposed to microwave heat. Always double-check the manufacturer’s instructions. If unsure, remove the lid entirely or use a paper towel to cover your food instead.
Uneven Heating
Microwaves heat food by exciting water molecules, and this heating can be notoriously uneven. A common mistake is zapping food for too long at high power without stirring. This can lead to some parts of your meal being scalding hot while others remain cold, or even cause “hot spots” that can damage the container. Always stir food halfway through heating and use slightly lower power settings for more consistent results.
The Environmental and Economic Benefits
Beyond the sheer convenience, investing in microwave-safe containers with locking lids offers significant long-term environmental and economic advantages.
From an environmental perspective, these reusable containers drastically reduce your reliance on single-use plastics like cling film, aluminum foil, and disposable takeout boxes. Every time you pack your lunch in a reusable container instead of buying a pre-packaged meal or using throwaway containers, you’re directly contributing to less waste ending up in landfills and oceans. Choosing durable materials like glass or high-quality BPA-free plastic further extends their lifespan, making them a sustainable choice for your kitchen.
Economically, the benefits are equally compelling.
* Save on Groceries: By enabling efficient meal prep, you’re more likely to cook at home, which is almost always cheaper than eating out or buying convenience foods.
* Reduce Food Waste: The superior airtight seal keeps food fresher for longer, meaning less spoilage and fewer ingredients thrown away. This is money saved directly from your grocery budget.
* Avoid Takeout Costs: With prepared meals ready to go, the temptation to order expensive takeout or delivery significantly decreases.
* Long-Term Investment: While the initial cost of a quality set might be more than cheap disposable options, their durability and reusability mean they pay for themselves many times over in the long run. You won’t constantly be repurchasing flimsy containers or disposable wraps.
In essence, these containers are not just kitchen tools; they’re smart investments that align with a more sustainable and budget-friendly lifestyle.
Frequently Asked Questions (FAQ)
Here are answers to some common questions about microwave-safe containers with locking lids:
Q1: How do I know if my container is microwave safe?
A: Look for a “microwave safe” label or symbol (often a microwave icon with wavy lines) on the bottom of the container. If it’s plastic, check the recycling symbol – #5 (Polypropylene or PP) is generally safe, while #2 (HDPE) might be. Avoid plastics with #1, #3, #6, or #7 unless specifically labeled “microwave-safe.” Glass and silicone are almost always microwave-safe.
Q2: Can I put hot food directly into these containers?
A: Yes, most high-quality microwave-safe containers with locking lids, especially those made of borosilicate glass or high-grade plastic like PP, are designed to withstand temperature changes and can safely hold hot food. However, it’s generally best to let very hot food cool down slightly before sealing with a lid to prevent condensation buildup and potential “thermal shock” to glass (though less likely with modern tempered glass).
Q3: Are glass containers better than plastic for microwaving?
A: Glass is often considered superior for microwaving because it’s non-porous (won’t absorb odors or stains), non-reactive (won’t leach chemicals), and highly heat-resistant. Plastic containers, even if microwave-safe and BPA-free, can sometimes stain or retain odors, and over time, may degrade. However, plastic is lighter and more shatter-resistant, making it more practical for transport.
Q4: Do locking lids create a vacuum seal?
A: No, locking lids typically create an airtight and leak-proof seal, but not a vacuum seal. A vacuum seal actively removes air from the container, which these lids generally don’t do. Their primary function is to create a tight barrier against external air and liquids.
Q5: Can I use the lids in the microwave?
A: It depends on the lid material. Many plastic lids are not microwave-safe and can warp, melt, or leach chemicals if heated. Always check the manufacturer’s instructions. If the lid is microwave-safe, it often has a vent to allow steam to escape. If unsure, remove the lid entirely or just use the base for heating. Glass lids are generally microwave-safe.
Q6: How do I prevent staining in plastic containers?
A: To prevent staining from tomato sauce or other colorful foods, try these tips:
* Spray the inside of the container with a non-stick cooking spray before adding food.
* Wash the container immediately after use.
* For existing stains, try soaking in a baking soda paste, scrubbing with lemon juice, or placing the container in direct sunlight.
Q7: Are these containers dishwasher safe?
A: Most high-quality microwave-safe containers with locking lids are dishwasher safe. For plastic containers and lids, it’s often recommended to place them on the top rack of the dishwasher to prevent warping from the intense heat of the lower rack’s heating element.
Q8: What does “BPA-free” mean and why is it important?
A: “BPA-free” means the product is made without Bisphenol A, an industrial chemical historically used in certain plastics and resins. Concerns have been raised about BPA potentially leaching into food and its possible health effects. Choosing BPA-free containers provides reassurance that you’re avoiding this chemical.
Q9: How long can I store food in these containers?
A: The storage duration depends more on the type of food and storage conditions (refrigerated vs. frozen) than the container itself. In the refrigerator, cooked food can typically last 3-4 days. In the freezer, food can last for several months, with the airtight seal helping to prevent freezer burn and maintain quality. Always follow general food safety guidelines for perishable items.
Q10: Can I freeze food in these containers and then microwave it?
A: Yes, this is one of their main advantages! Most glass and high-quality plastic/silicone microwave-safe containers are also freezer-safe. When microwaving from frozen, ensure the lid is properly vented or removed. You may need to microwave in shorter intervals, stirring frequently, to ensure even thawing and heating.
Conclusion
The humble microwave-safe containers with locking lids are far more than just basic kitchen items; they are foundational tools for modern living. They empower you to embrace meal prep, reduce food waste, simplify your daily routine, and enjoy fresh, delicious meals on demand. By understanding the nuances of safe materials, appreciating the engineering behind robust locking lids, and adopting best practices for use and care, you’re not just buying containers – you’re investing in efficiency, health, and peace of mind.
So, go ahead and stock your kitchen with these indispensable allies. You’ll quickly discover how they transform the way you store, transport, and enjoy your food, making every day a little bit easier and a lot more delicious. Happy prepping and happy reheating!