Mastering the Art of Sushi Making at Home: Your Ultimate Guide
- Alas Complete 20 Piece Sushi Making Set – Kit for Beginners & Pros with Knife, 2 Mats, Rice Bazooka and Dipping Plate
- Delamu Sushi Making Kit, 20 in 1 Bazooka Roller Kit with Chef’s Knife, Bamboo Mats, Rice Mold, Temaki Sushi Mats, Rice Paddle, Spreader, Chopsticks, Sauce Dishes, Guide Book
- FUNGYAND Sushi Making Kit, 27-in-1 Professional Maker Set with Bazooka Roller, Nigiri & Musubi Presses, Bamboo Mats, Knife, Chopsticks, Ceramic Dishes – Ideal for Beginners
Ever dreamed of creating beautiful, delicious sushi rolls right in your own kitchen? While it might seem intimidating at first, the truth is that making sushi at home is an incredibly rewarding and surprisingly accessible culinary adventure! With a little guidance and the right techniques, you’ll be rolling like a pro in no time.
This comprehensive guide will walk you through every step of the process, from perfecting that essential sushi rice to crafting gorgeous rolls, all while sharing expert tips and helping you avoid common pitfalls. Get ready to impress your friends and family with your newfound sushi-making prowess!
Why Make Sushi at Home?
Before we dive into the how-to, let’s explore why DIY sushi is an experience you won’t want to miss:
- Freshness You Can Taste: You control the quality and freshness of every ingredient.
- Endless Customization: Design rolls exactly to your liking – vegetarian, seafood, cooked, spicy, mild… the possibilities are limitless!
- Cost-Effective: Enjoy a sushi feast for a fraction of the cost of dining out.
- A Fun Activity: It’s a fantastic solo project, a romantic date night, or a lively group activity.
- Impress Your Guests: Nothing says “culinary wizard” like serving homemade sushi!
The Essentials: What You’ll Need
To embark on your sushi journey, you’ll need a few key ingredients and pieces of equipment. Remember, quality ingredients make a significant difference in the final taste.
Essential Ingredients:
- Sushi Rice: This is the heart of your sushi. Look for Japanese short-grain rice (sometimes labeled “sushi rice”). It has the perfect stickiness and texture.
- Nori (Seaweed Sheets): These crispy, dried seaweed sheets hold your rolls together. Ensure they are fresh and pliable.
- Rice Vinegar: Specifically, Japanese rice vinegar for seasoning the rice.
- Sugar & Salt: To create the perfect sushi rice seasoning.
- Your Favorite Fillings:
- Vegetables: Cucumber (seedless strips), avocado (sliced thinly), carrots (julienned), bell peppers (strips).
- Cooked Options: Imitation crab sticks (surimi), cooked shrimp, tamagoyaki (Japanese egg omelet).
- Fish (Use with Caution!): If using raw fish, it MUST be “sushi-grade” or “sashimi-grade” from a reputable fishmonger. Never use regular grocery store fish for raw sushi due to safety concerns.
- Accompaniments: Soy sauce, pickled ginger (gari), wasabi.
Essential Equipment:
- Bamboo Rolling Mat (Makisu): Absolutely essential for rolling uniform sushi. You can find these affordably online or in Asian markets.
- Sharp Knife: A very sharp, thin-bladed knife is crucial for clean cuts. A chef’s knife or a specific sushi knife works best.
- Large Mixing Bowl (Non-Metallic): For seasoning your cooked rice. Wood or glass is ideal.
- Rice Paddle or Flat Spatula: For mixing and handling the rice without mashing it.
- Small Bowl of Water: For wetting your hands to prevent rice from sticking.
Step 1: The Foundation – Perfect Sushi Rice
This is the most critical step! Great sushi starts with great rice.
- Rinse the Rice (Thoroughly!): Measure your desired amount of sushi rice (e.g., 2 cups for 4-6 rolls). Place it in a fine-mesh sieve or a bowl and rinse it under cold running water. Swirl it with your hand until the water runs clear. This removes excess starch, preventing sticky, gummy rice. Drain well.
- Cook the Rice:
- Rice Cooker Method: Follow your rice cooker’s instructions for short-grain rice. Generally, for 2 cups of rice, use 2 cups of water. Let it rest for 10-15 minutes after cooking before opening the lid.
- Stovetop Method: Combine 2 cups of rinsed rice with 2 cups of cold water in a heavy-bottomed pot with a tight-fitting lid. Bring to a boil over medium-high heat. Once boiling, reduce heat to the lowest setting, cover tightly, and simmer for 15 minutes. Do not lift the lid! Remove from heat and let it steam, still covered, for another 10-15 minutes.
- Prepare the Sushi-zu (Rice Vinegar Seasoning): While the rice cooks, prepare your seasoning. For 2 cups of dry rice, combine:
- 4 tablespoons Japanese rice vinegar
- 2 tablespoons sugar
- 1 teaspoon salt
Stir until the sugar and salt are completely dissolved. You can gently heat it in a small saucepan if needed, but don’t boil.
- Season the Rice: Transfer the hot, cooked rice to your large non-metallic bowl. Pour the sushi-zu evenly over the rice. Using a rice paddle or flat spatula, gently “cut” or “fold” the seasoning into the rice. Avoid mashing. You want to separate the grains slightly while coating them. Fan the rice (with a hand fan or a piece of cardboard) as you mix; this helps it cool faster and gives it a beautiful sheen.
- Cool the Rice: Continue fanning and folding the rice until it reaches body temperature. It should be warm, not hot or cold. Cover with a damp cloth to prevent drying out while you prepare your fillings.
Step 2: Preparing Your Fillings
While your rice cools, prepare your chosen fillings. Consistency is key here for easy rolling and beautiful presentation.
- Cut everything into uniform strips or pieces. Aim for about ¼ to ½ inch thickness.
- Don’t overload your rolls with too many ingredients. Two to three fillings per roll is a good starting point.
- Examples:
- Cucumber: Cut into thin sticks, removing the seedy core if desired.
- Avocado: Slice thinly lengthwise.
- Fish (sushi-grade): Slice against the grain into long, thin strips.
- Imitation Crab: Use whole sticks or shred them lightly.
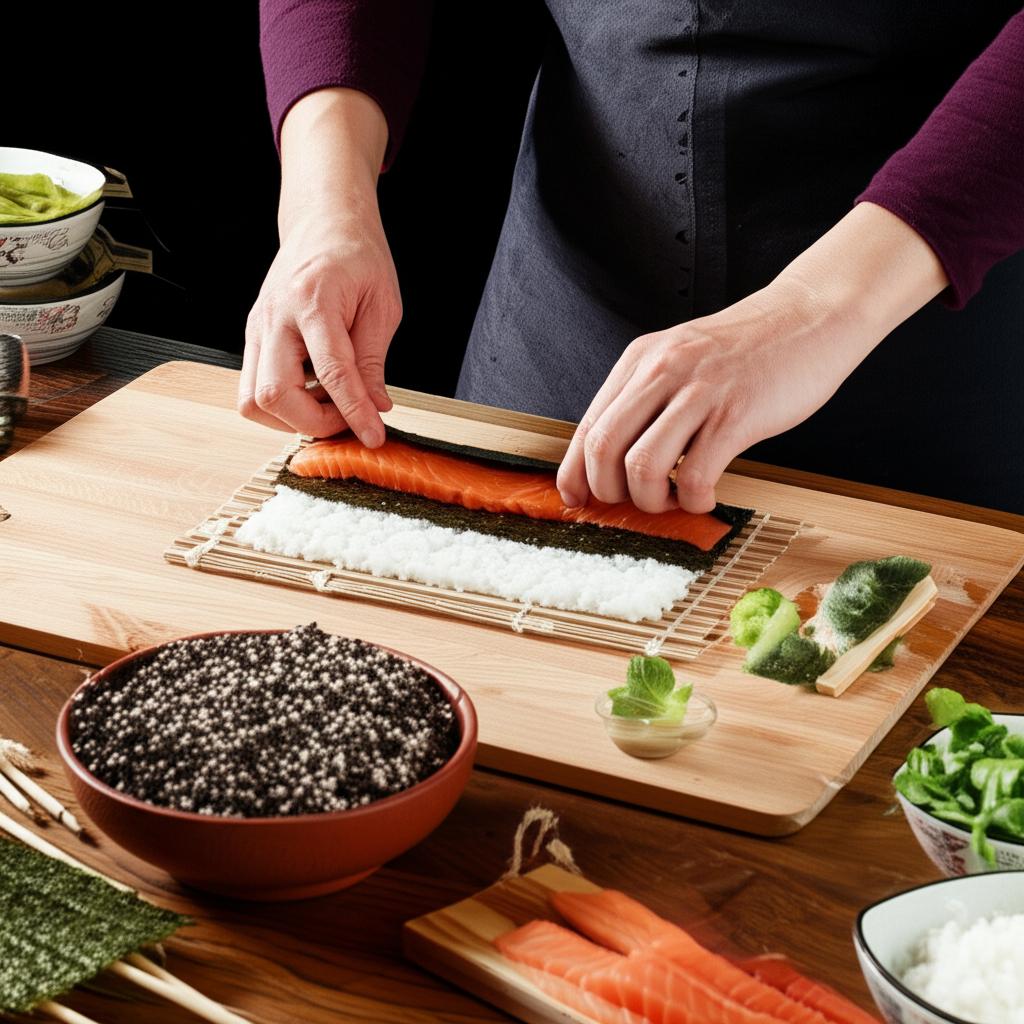
Step 3: Assembling Your Rolls (Maki)
This is where the magic happens! We’ll focus on inside-out rolls (uramaki), which are popular and often easier for beginners, but the technique is similar for traditional maki.
-
Prepare Your Workstation:
- Lay your bamboo rolling mat flat on a clean surface.
- Place a sheet of plastic wrap over the mat (this prevents rice from sticking and makes clean-up easy).
- Have a small bowl of cold water nearby for wetting your hands.
- Arrange your seasoned rice and prepared fillings within easy reach.
-
Place the Nori: Place one sheet of nori shiny side down on the plastic-wrapped bamboo mat.
-
Spread the Rice:
- Dip your hands in the cold water (this is crucial to prevent stickiness!).
- Take about ¾ to 1 cup of seasoned sushi rice and place it on the nori.
- Gently and evenly spread the rice across the entire nori sheet, pushing it almost to the edges. Don’t press too hard, or you’ll mash the rice.
- For inside-out rolls (uramaki): Sprinkle a thin layer of sesame seeds (optional) over the rice. Carefully flip the nori sheet over so the rice side is now on the mat, and the nori side is facing up.
- For traditional rolls (nori on outside): Leave about a ½-inch strip of nori exposed at the top edge (the furthest edge from you). This will be used to seal the roll.
-
Add Your Fillings:
- Arrange your chosen fillings in a single line horizontally across the center of the nori sheet (or the center of the nori side if doing uramaki).
- Do not overfill! This is one of the most common mistakes and leads to messy, unrollable sushi.
-
The Roll (The Tricky Part, But You Got This!):
- Lift the edge of the bamboo mat closest to you, bringing it up and over your fillings.
- Tuck the edge of the nori/rice over the fillings and pull it tightly towards you, ensuring the fillings are encased.
- Apply gentle, even pressure to create a tight cylinder.
- Continue rolling the mat forward, lifting the mat slightly as you go to prevent it from getting rolled into the sushi. Keep applying gentle, consistent pressure to maintain a tight, uniform shape.
- Once you reach the end, give the roll a final squeeze and shape with the mat to ensure it’s a firm, cylindrical roll.
-
Seal the Roll (If Nori is on Outside): If you left a ½-inch strip of nori at the end, moisten it lightly with a tiny dab of water on your finger. This will help seal the roll completely.
-
Cut the Roll:
- Transfer the rolled sushi to a clean cutting board.
- Crucially: Wet your sharp knife blade thoroughly with cold water before each cut. Wipe it clean between cuts.
- Slice the roll in half first. Then, place the two halves side-by-side and cut them into quarters, or cut each half into three pieces, for a total of 6 or 8 pieces per roll.
- Use a gentle sawing motion rather than pressing down firmly, which can flatten the roll.
Tips for Sushi-Making Success
- Practice Makes Perfect: Your first roll might not be restaurant-perfect, and that’s okay! Each roll will get better.
- Keep Your Hands and Knife Wet: This is the golden rule for dealing with sticky rice.
- Don’t Overfill: It’s the #1 reason for a sushi disaster. Less is more when it comes to fillings.
- Use Fresh, High-Quality Ingredients: Especially for seafood, this impacts both taste and safety.
- Experiment with Fillings: Don’t be afraid to get creative! Leftover cooked chicken, cream cheese, mango, or even crispy fried onions can make delicious additions.
- Keep it Clean: Have a damp towel handy to wipe your hands and workspace as you go.
Common Mistakes to Avoid
- Under- or Overcooked Rice: Rice that’s too hard or too mushy will ruin your sushi. Follow cooking instructions carefully.
- Not Seasoning the Rice Properly: Skipping the vinegar mix results in bland sushi. Too much, and it’s overpowering.
- Overfilling the Roll: Leads to bursting rolls and difficulty in cutting.
- Using a Dull Knife: This will crush your beautifully rolled sushi instead of slicing it cleanly. Sharpen your knife!
- Not Wetting Your Hands or Knife: Prepare for a sticky, frustrating mess.
- Rolling Too Loosely: Your sushi will fall apart when picked up. Aim for a firm, tight roll.
- Using Non-Sushi Grade Raw Fish: This is a major safety hazard and can lead to foodborne illness. Stick to cooked ingredients or reputable sushi-grade fish only.
Serving and Enjoying Your Homemade Sushi
Arrange your freshly cut sushi pieces artfully on a serving platter. Serve immediately with small bowls of soy sauce, a dab of wasabi (if desired), and a side of pickled ginger to cleanse the palate between bites.
Congratulations! You’ve just mastered the art of sushi making at home. Take a moment to admire your culinary creations before diving in. There’s immense satisfaction in enjoying something delicious you’ve crafted with your own hands.
So, gather your ingredients, clear your counter, and get ready to roll! Happy sushi making!
- Alas Complete 20 Piece Sushi Making Set – Kit for Beginners & Pros with Knife, 2 Mats, Rice Bazooka and Dipping Plate
- Delamu Sushi Making Kit, 20 in 1 Bazooka Roller Kit with Chef’s Knife, Bamboo Mats, Rice Mold, Temaki Sushi Mats, Rice Paddle, Spreader, Chopsticks, Sauce Dishes, Guide Book
- FUNGYAND Sushi Making Kit, 27-in-1 Professional Maker Set with Bazooka Roller, Nigiri & Musubi Presses, Bamboo Mats, Knife, Chopsticks, Ceramic Dishes – Ideal for Beginners
FAQ
Q. What kind of rice should I use for sushi and how do I prepare it?
A. You must use Japanese short-grain rice, often labeled “sushi rice.” Rinse the rice thoroughly under cold water until the water runs clear. Cook it according to package directions, typically in a rice cooker. Once cooked, gently fold in a mixture of rice vinegar, sugar, and salt (sushi-zu) while the rice is still warm, fanning it to cool and give it a glossy finish.
Q. Do I need any special equipment to make sushi at home?
A. While not strictly essential, a few tools greatly simplify the process. A bamboo rolling mat (makisu) is crucial for rolling maki. A very sharp knife (like a yanagiba or a sharp chef’s knife) is needed for clean cuts. A rice paddle, a small bowl of water mixed with a little vinegar (tezu) to prevent rice sticking to your hands, and a cutting board are also helpful.
Q. Where can I source sushi-grade fish, and what should I look for?
A. It is critical to use “sushi-grade” or “sashimi-grade” fish, which has been handled and often flash-frozen specifically for raw consumption. Look for it at reputable Asian markets, specialty seafood shops, or trusted online purveyors. Always ask your fishmonger if the fish is safe to eat raw. Avoid using regular supermarket fish for raw sushi.
Q. My sushi rolls fall apart. What am I doing wrong?
A. This is a common challenge! It often results from not applying enough firm, even pressure when rolling, using too much filling, or unevenly distributing the rice. Ensure you use the bamboo mat to tightly compress the roll as you go. Don’t overfill your rolls, and spread the rice thin but covering most of the nori. Dampening the far edge of the nori with water before the final roll helps to seal it.
Q. Can I make sushi if I don’t eat raw fish? What are some popular vegetarian or cooked options?
A. Absolutely! Many delicious sushi varieties do not contain raw fish. Popular vegetarian options include avocado rolls, cucumber rolls, shiitake mushroom rolls, or even sweet potato tempura rolls. Cooked options include California rolls (imitation crab, avocado, cucumber), cooked shrimp tempura rolls, or rolls with cooked chicken or beef teriyaki.
Q. How do I slice the sushi rolls without squishing them?
A. A very sharp knife and a bit of technique are key. Before each cut, wet your knife blade with water and wipe off excess, which prevents rice from sticking. Use a gentle back-and-forth sawing motion rather than pressing straight down. Aim for uniform pieces, typically 6 or 8 slices per roll.
Q. How long can homemade sushi be stored, and what’s the best way to keep it fresh?
A. For optimal taste, texture, and safety, homemade sushi, especially with raw fish, should be consumed immediately after preparation. If you must store it, wrap it tightly in plastic wrap to minimize air exposure and refrigerate for no more than 24 hours. Be aware that the rice can harden and the nori may become chewy when chilled, so fresh is always best. Sushi containing raw fish should not be left at room temperature for more than 2 hours.